Accounting
Forms
OVERVIEW: This section guides the User in understanding the columns and fields in the Accounting Form.
 Assets, Liabilities, and Equity Panels
Acct: Displays an image associated with the account record.
Name: Displays the name given to the account.
Balance: Displays the balance of all the transactions of the account.
Assets Total: Displays the total balance of all the asset accounts.
Total Liabilities: Displays the total balance of all the liability accounts.
Total Equity: Displays the total balance of all the equity accounts.
Context Menu
- New Account: Selecting this option opens up the New Account Form. This form allows a User to create a new account record.
- View Account Details: Selecting this option opens up the Account Details Form allowing the User to view more details about the account.
NOTE: Selecting an account from one of the left panels will display only the account entries for that particular account in the Account Entries Panel.
 Account Entries Panel
Acct: Displays an image associated with the account record.
Transaction Date: Displays the date that the transaction occurred.
Name: Displays a brief description of the transaction.
Debit: Displays the amount owed in the transaction.
Credit: Displays the amount received in the transaction.
Balance: Displays the balance of all the transactions of the account.
New Transaction Button: Pressing this button opens up the New Account Transaction Form. Alternatively, this form can also be opened by clicking within the grid and selecting the New Transaction option from the context menu. For information on the fields in a transaction, see Account Transaction Details.
Payroll Check Run: Pressing this button opens up the New Payroll Entry Form.
NOTE: Double clicking on a transaction record will open up the Edit Account Transaction Form allowing the User to edit any details of the transaction.
OVERVIEW: This section guides the User in the understanding of fields in the Accounts Payable Form.
There are two tabs on this form: the Accounts Payable tab and the Paid Accounts Payable tab. These tabs sort the records by paid/partially paid and unpaid statuses.
- Account: Displays the name of the account to make the payment from.
- Supplier: Displays the name of the supplier to make the payment to.
- PO: Displays the Purchase Order number of the record that incurred the record.
- Amount: Displays the amount due before taxes.
- Tax: Displays the tax amount to be paid.
- Total: Displays the total amount due. This is calculated by adding the Amount to the Tax values.
- Payable Date: Displays the date in which the payment is payable.
- Due Date: Displays the date in which the payment is due.
- Payment Status: Displays the current status of the payment.
- New Account Payable Button: Pressing this button opens the New Account Payable Form. This form allows the creation of a new account payable record. Alternatively, this form can be opened by right clicking in the grid and selecting the New Account Payable option from the context menu. Double clicking a record will open up the Accounting Form which allows the User to modify any of the details of the record.
OVERVIEW: This section guides the User in the understanding of fields in the Account Payable Details Form.
Account Payable Details Panel
- From Account: Displays the name of the account to make the payment from.
- PO ID: Displays the Purchase Order number that incurred the record.
- View PO Details Button: Opens up the Purchase Order Details Form giving a more detailed view of the purchase order.
- Find PO Button: Opens up the Find Purchase Order Form which allows the User to do a more refined search.
- Supplier: Displays the name of the supplier to make the payment to.
- View Supplier Button: Opens up the Supplier Details Form giving a more detailed view of the supplier.
- Find Supplier Button: Opens up the Find Supplier Form which allows the User to do a more refined search.
- Invoice #: Displays the Invoice Number associated to the account payable record.
- Amount: Displays the amount to be paid.
- Tax: Displays the tax amount to be paid.
- Total: Displays the total amount due. This is calculated by adding the Amount to the Tax values.
- Payable Date: Displays the date in which the payment is payable.
- Due Date: Displays the date in which the payment is due.
- Payment Status: Displays the current status of the payment.
- Notes: Allows the User to enter any additional notes or details about the record.
- Employee: Displays the name of the employee creating the payment.
- View Employee Button: Opens up the Employee Details Form giving a more detailed view of the employee.
- Find Employee Button: Opens up the Find Employee Form which allows the User to do a more refined search.
Account Payable Payments Panel
- Payment Type: Displays the payment type of the payment.
- Amount: Displays the amount of the payment.
- Payment Date: Displays the date that the payment was made.
- Notes: Displays any additional notes or information about the payment.
- New Payment Button: Opens up the New Accounts Payable Payment Form which allows the User to create a payment record. Alternatively, this form can be opened by right clicking the grid and selecting the New Payment option from the context menu.
- Balance: Displays the remaining balance to pay.
Account Entries Panel
- Acct.: Displays the image icon associated with the account.
- Transaction Date: Displays the date that the transaction was made.
- Name: Displays the description of the account transaction details.
- Debit: Displays the debit amount of the payment.
- Credit: Displays the credit amount of the payment.
- Balance: Displays the balance of the account.
- New Transaction Button: Opens up the New Account Transaction Form which allows the User to create a transaction.
OVERVIEW: This section guides the User in the understanding of fields in the Accounts Receivable Form.
There are two tabs on this form: the Accounts Receivable tab and the Paid Accounts Receivable tab. These tabs sort the records by paid/partially paid and unpaid statuses.
- Account: Displays the name of the account to make the payment from.
- Customer: Displays the name of the customer to receive the payment from.
- Invoice: Displays the Invoice number of the invoice that incurred the record.
- Subtotal: Displays the amount due before taxes.
- Tax: Displays the tax amount to be paid.
- Total: Displays the total amount due. This is calculated by adding the Amount to the Tax values.
- Receivable Date: Displays the date in which the payment is receivable.
- Due Date: Displays the date in which the payment is due.
- Payment Status: Displays the current status of the payment.
- New Account Receivable Button: Pressing this button opens the New Account Receivable Form. This form allows the creation of a new account receivable record. Alternatively, this form can be opened by right clicking in the grid and selecting the New Account Receivable option from the context menu. Double clicking a record will open up the Accounting Form which allows the User to modify any of the details of the record.
OVERVIEW: This section guides the User in the understanding of fields in the Account Receivable Details Form.
Account Receivable Details Panel
- From Account: Displays the name of the account to make the payment from.
- Invoice: Displays the Invoice number of the invoice that incurred the record.
- View Invoice Button: Opens up the Invoice Report, giving a more detailed view of the purchase order.
- Find Invoice Button: Opens up the Find Invoice Form which allows the User to do a more refined search.
- Sub Total: Displays the amount to be paid.
- Tax: Displays the tax amount to be paid.
- Total: Displays the total amount due. This is calculated by adding the Amount to the Tax values.
- Receivable Date: Displays the date in which the payment is receivable.
- Due Date: Displays the date in which the payment is due.
- Payment Status: Displays the current status of the payment.
- Notes: Allows the User to enter any additional notes or details about the record.
- Employee: Displays the name of the employee creating the payment.
- View Employee Button: Opens up the Employee Details Form giving a more detailed view of the employee.
- Find Employee Button: Opens up the Find Employee Form which allows the User to do a more refined search.
Account Receivable Payments Panel
- Payment Type: Displays the payment type of the payment.
- Amount: Displays the amount of the payment.
- Payment Date: Displays the date that the payment was made.
- Notes: Displays any additional notes or information about the payment.
- New Payment Button: Opens up the New Accounts Receivable Payment Form which allows the User to create a payment record. Alternatively, this form can be opened by right clicking the grid and selecting the New Payment option from the context menu.
- Balance: Displays the remaining balance to pay.
Account Entries Panel
- Acct.: Displays the image icon associated with the account.
- Transaction Date: Displays the date that the transaction was made.
- Name: Displays the description of the account transaction details.
- Debit: Displays the debit amount of the payment.
- Credit: Displays the credit amount of the payment.
- Balance: Displays the balance of the account.
- New Transaction Button: Opens up the New Account Transaction Form which allows the User to create a transaction.
OVERVIEW: This section guides the User in understanding the columns and fields in the New Account Transaction form and also the Edit Account Transaction form.
Account Panel
- Acct: Displays an image associated with the account record.
- Num: Displays the number given to the account.
- Name: Displays the name given to the account.
- Balance: Displays the balance of all the transactions of the account.
Context Menu
- New Account: Selecting this option opens up the New Account form. This form allows a User to create a new account record.
- View Account Details: Selecting this option opens up the Account Details form allowing the User to view more details about the account.
Account Entries Panel
To create transactions, click and drag an Account from the Accounts Panel and drop the record into the Account Entries Panel. The entry will be added with the default Debit and Credit values of $0.
NOTE: In order to successfully process the transaction, the transaction values must balance out.
- Acct: Displays an image associated with the account record.
- Num: Displays the number of the account.
- Account: Displays the name of the account.
- Debit: Displays the amount owed in the transaction.
- Credit: Displays the amount received in the transaction.
NOTE: Double clicking on a transaction record will open up the Edit Account Transaction form allowing the User to edit any details of the transaction.
Account Transaction Details Panel
- Date: Allows the User to specify a date for the transaction record.
- Employee: Displays the name of the employee that is recording the transaction.
- View Employee Button: Opens up the Employee Details form giving a more detailed view of the employee.
- Find Employee Button: Opens up the Find Employee form which allows the User to do a more refined search.
- Description: Allows the User to enter a description of the transaction.
- Process Button: Saves the transaction record and closes the form.
- Cancel Button: Cancels any changes that were made and closes the form.
Receipts Panel
This panel allows the User to attach any receipts that are associated to the transaction. This can be done by right clicking the grid and choosing the Insert File option.
OVERVIEW: This section guides the User on the understanding of columns in the Accounting Periods form.
Accounting/Budget Periods Panel
- Budget Period Name: Displays the name of the budget period.
- Start Date: Displays the start date of the budget period.
- End Date: Displays the end date of the budget period.
- Revenue: Displays the total amount of credited equity transactions.
- Expenses: Displays the total amount of debited equity transactions.
- Balance: Displays the total balance amount of equity transactions.
- New Budget Period Button: Pressing this button opens up the New Budget Period form allowing the User to create a new budget period record. Alternatively, right clicking within the grid and selecting the New Budget Period option from the context menu will also open this form.
Double clicking any of the budget period records will open up the Accounting Period Details form which gives more detailed information about the budget period. See Accounting Details for more information.
OVERVIEW: This section guides the User on the understanding of fields in the Accounts form.
- Account: Displays the account number of the account record.
- Name: Displays the name of the account record.
- RC Name: Displays the name of the responsibility center of the account record.
- New Account Button: Opens the Accounting form which allows the creation of a new account. Alternatively, this form can be opened by right clicking anywhere in the grid and selecting the New Account option from the context menu.
NOTE: Double clicking a record will open up a detailed view of the account record. Alternatively, right clicking on a record and selecting the View Account Details option will also do this.
OVERVIEW: This section guides the User on the understanding of fields in the New Account Form.
New Account Panel
- Number: Allows the user to supply the account number of the account record.
- Name: Allows the user to supply the name of the account record.
- Class: Allows the user to select a class of the account from a drop down list.
- Currency: Allows the user to select the currency type of the account from a drop down list.
- Resp. Center: Allows the user to select the responsibility center of the account from a drop down list.
- Save Button: Saves any changes to the record and closes the form.
- Cancel Button: Cancels any changes made to the record and closes the form.
OVERVIEW: This section guides the User in understanding the columns and fields in the Account Cheques form.
There are several tabs on this form that sort existing cheques by their statuses. The cheque statuses are as follows: Created, Canceled, Cancel Pending, Paid, Printed, and Void.
- Account: Displays the image associated to the cheque account.
- Cheque: Displays the Cheque Number of the cheque record.
- Pay To: Displays who the cheque is payable to.
- Amount Value: Displays the payable amount of the cheque in a numeric format.
- Amount Text: Displays the payable amount of the cheque in a text format.
- Cheque Date: Displays the date of the cheque.
- Cheque Status: Displays the status of the cheque.
- New Cheque Button: Pressing this button will open up the New Cheque form. For information on completing the fields of this form see Cheque Details.
OVERVIEW: This section guides the User in understanding the columns and fields in the View Cheque Details form.
Cheque Details Section
- Account: Displays the account that will be issuing the cheque.
- Pay: Displays the payable amount of the cheque in a text format.
- To The Order Of: Displays the cheque's recipient value.
- Address: Displays the recipient address of the cheque.
- View Address Details Button: Pressing this button will open up the Address Details form which gives the User more detailed information about the selected address.
- Find Address Button: Pressing this button will open up the Find Address form which allows the User to perform a more refined search for a specific address.
- Cheque: Displays the Cheque Number of the cheque record.
- Cheque Date: Displays the date of the cheque.
- Amount Value: Displays the payable amount of the cheque in a numeric format.
General Details Section
- Employee: Displays the name of the employee that is issuing the cheque.
- View Employee Details Button: Pressing this button will open up the Employee Details form which gives the User more detailed information about the selected employee.
- Find Employee Button: Pressing this button will open up the Find Employee form which allows the User to perform a more refined search for a specific employee.
- Account Transaction: Displays the name of the accounting transaction that is related to the cheque.
- View Transaction Details Button: Pressing this button will open up the View Account Transaction form which gives the User more detailed information about the selected transaction.
- Find Accounting Transaction Button: Pressing this button will open up the Find Accounting Transaction form which allows the User to perform a more refined search for a specific transaction.
- Cheque Status: Displays the status of the cheque.
- Account Payable: Displays the name of the account payable of the cheque.
- Cheque Memo: Displays the memo information of the cheque.
- Cheque Notes: Displays any additional notes or details of the cheque.
- Print Cheque Button: Prints the current cheque.
- Mark Cheque as Printed Button: Flags the cheque as being printed.
- View Cheque Button: Opens up the View Cheque Report.
- Save Button: Saves the current cheque details and closes the form.
- Cancel Button: Cancels any changes made to the cheque details and closes the form.
OVERVIEW: This section guides the User on the understanding of columns in the Budget Periods Form.
Budget Periods Panel
- Budget Period Name: Displays the name of the budget period.
- Start Date: Displays the start date of the budget period.
- End Date: Displays the end date of the budget period.
- Revenue: Displays the revenue amount of the budget period.
- Expenses: Displays the expense amount of the budget period.
- Balance: Displays the total balance amount of the budget period.
- New Budget Period Button: Pressing this button opens up the New Budget Period Form allowing the User to create a new budget period record. Alternatively, right clicking within the grid and selecting the New Budget Period option from the context menu will also open this form.
Double clicking any of the budget period records will open up the Budget Period Details Form which gives more detailed information about the budget period.
OVERVIEW: This section guides the User in understanding the columns and fields in the Payroll form.
Payroll Panel
- Picture: Displays an image of the payroll employee.
- Employee: Displays the name of the payroll employee.
- Pay Date: Displays the payment date of the payroll record.
- Amount: Displays the amount to be paid for the payroll record.
- Clear: Displays the amount to be received by the employee after taxes and deductions.
- Payroll Check Run Button: Opens the New Payroll Entry form which allows the User to create a new payroll record. This can also be achieved by using the right click context menu and selecting the New Payroll Entry option.
Payroll Details Panel
- Employee: Displays the name of the payroll employee.
- Pay Date: Displays the payment date of the payroll record.
- From Date: Displays the starting date of the payroll record payment period.
- To Date: Displays the end date of the payroll record payment period.
- Amount: Displays the amount to be paid for the payroll record.
- Fed Tax: Displays the amount of Federal Taxes to be deducted from the Employee's pay.
- Prov Tax: Displays the amount of Provincial Taxes to be deducted from the Employee's pay.
- EI: Displays the amount of Employment Insurance contributions to be deducted from the Employee's pay.
- Clear: Displays the amount to be received by the employee after taxes and deductions.
- Vacation: Displays the amount of vacation pay accumulated by the employee.
- IOU: Displays the amount owing value to the employee.
To view more information on Payroll Stats, view the Accounting form.
OVERVIEW: This section guides the User in understanding the columns and fields in the Payroll Employees form.
Payroll Employees Panel
- Picture: Displays an image of the payroll employee.
- Employee: Displays the name of the payroll employee.
- Amount: Displays the amount to be paid for each payroll record.
- Clear: Displays the amount to be recieved by the employee after taxes and deductions.
Payroll Stats Panel
- Picture: Displays an image of the payroll employee.
- Employee: Displays the name of the payroll employee.
- CPP YTD: Displays the year to date Canadian Pension Plan contributions for the payroll employee.
- EI YTD: Displays the year to date Employment Insurance contributions for the payroll employee.
- Amount: Displays the amount to be paid for the payroll record.
- Clear: Displays the amount to be recieved by the employee after taxes and deductions.
NOTE: Right clicking within one of the grids and selecting the New Payroll Entry option will open the New Payroll Employee form.

Invoices to Export
List of Invoices that are ready to be exported to a secondary financial system
Double-clicking on an entry under this tab will open the Invoice report.
Invoice Reports
Double-clicking on an entry under this tab will open the Invoice report.
Quote
Invoice #
Customer
PO Number
Employee
Invoice Date
Total
Quote Sent
PO Received
Invoice Sent
Payment Received
Receivable Count
Receivable
SA Exported

Invoice Num
When an invoice is created, VimBiz automatically assigns a number to the new record.
Employee
Name of the Employee who has created the Invoice.
Employees are administered in the Manage Employees form.
Click on the  button to view the Employee Details.
Click on the  button to find another Employee.
Cost Center
Name of the Cost Center that will absorb most or all of the Invoice costs.
Cost Centers are administered in the Cost Centers form.
Click on the  button to view the Cost Center Details.
Click on the button to find another Cost Center
Additional Cost Centers can be assigned to each Product.
ADD: Right-click on a Product and select Invoice Product Cost Center
A subform will open, where additional Cost Centers can be assigned, and amounts or percentages can be selected for each Center.
Account
Name of the Account where most or all Invoice costs will be charged.
Accounts are administered in the Accounts form.
Click on the (...) button to view the Account Details form.
Click on the button to find another Account.
Additional Accounts can be assigned to each Product.
ADD: Right-click on a Product and select Invoice Product Accounts
A subform will open, where additional Accounts can be assigned, and amounts or percentages can be selected for each Account.
Ship. Address
Address where the ordered Products will be shipped..
Addressed are administered in the Manage Addresses form.
Click on the  button to view the Address Details form.
Click on the button to find another Address.
Inv. Address
Address where the Invoice will be sent for the ordered Products.
Addressed are administered in the Manage Addresses form.
Click on the button to view the Address Details form.
Click on the button to find another Address.
Note to Buyer
Area where notes can be inserted for the person purchasing the Products.
External Ref. #
If a secondary system is used to track financial transactions, that reference number may be entered in this field.
Department
Name of the Department for which the Products are being ordered.
Departments are administered in the Departments form.
Click on the  button to view the Department Details form.
Click on the button to find another Department.
Customer
Name of the Customer for whom the Products are being ordered.
Customers are administered in the Manage Customers form.
Click on the  button to view the Customer Details.
Click on the button to find another Customer.
Cust. Account
If an Account has been linked to the Customer in their Customer Details form, it can be selected in this cell.
Click on the arrow and select an entry from the drop down list.
If no account has been linked to the Customer, N/A will appear here.
Service Req.
Invoices can be linked to a Service Request.
Service Requests are administered in the Manage Service Requests form.
Click on the arrow and select an entry from the drop down list.
Click on the  button to view the Service Request Details.
Click on the button to find another Service Request.
Project
Invoices can be linked to a Production Project or an Engineering Project.
Production Projects are administered in the Manage Production Projects form.
Engineering Projects are administered in the Manage Projects form.
Click on the arrow and select an entry from the drop down list.
Click on the  button to view either the Production Project Details or the Project Details form.
Click on the button to find another Project.
Quote
Check this box to create a Quote from the Invoice.
Quotes are administered in the Quotes form.
PO Num
If a Purchase Order has been created following the Invoice, type the number here.
Purchase Orders are administered in the Purchase Orders form.
PO Numbers are assigned to newly-created Purchase Orders, and appear in the Purchase Order Details form.
Contact
Type the name of the person to contact with regards to the Invoice.
Discount
If a discount is being applied to the entire Invoice, enter the percentage amount in this field.
Create PO
Check this box to create a new Purchase Order for the requested Products, instead of adding items to existing POs for the same Supplier.
Project Task
If the Products were ordered from the Project Details form, the Task Name will appear in this field.
Ordered Products
View Report
Click this button to view the Invoice report.
OVERVIEW: This section guides the User in understanding the columns and fields in the Tax Remittance Details Form.
Date Range Section
- From Date: The start date of the tax remittance period.
- To Date: The end date of the tax remittance period.
- Calculate Button: Calculates the tax remittance details based on the payroll records that were paid out between the From Date and the To Date.
Calculations Section
- CPP Contributions: The Canadian Pension Plan contributions owed.
- Employee: The Employee Insurance contributions owed.
- CPP Multiplier: The rate at which to multiply the values of the CPP contributions.
- EI Multiplier: The rate at which to multiply the values of the EI contributions.
Payment Section
- No of Employees: The number of employees that made contributions between the From Date and the To Date.
- CPP Payment: The total CPP Payment to be calculated in the total payment. This value is calculated by multiplying the CPP Contributions by the CPP Multiplier.
- EI Payment: The total EI Payment to be calculated in the total payment. This value is calculated by multiplying the EI Contributions by the EI Multiplier.
- Fed Deductions: The total amount of federal tax deductions to be paid.
- Prov Deductions: The total amount of provincial tax deductions to be paid.
- Tax Deductions: The total amount of tax deductions to be paid. The total tax deductions is a sum of the Federal deductions and the Provincial deductions.
- Gross Payroll: The total amount of payroll payments calculated before taxes.
- Current Payment: The total amount of payment needed for the tax remittance. This amount is calculated by adding the Total Tax Deductions, CPP Payment, and the EI Payment fields together.
- Save Button: Saves the current tax remittance details and closes the form.
- Cancel Button: Cancels any changes made to the tax remittance details and closes the form.
OVERVIEW: Responsibility Centers are used to track Expenses to different Budgets and Projects.
Add/Edit Responsibility Center Numbers and Descriptions
Manage Assets Form
- When creating a New Asset record or editing the Asset Details, click on the View Responsibility Centre button next to the Purch. CC or Oper. CC fields. To change or add a Responsibility Center, click the magnifying glass button to Find a Responsibility Center to which the Asset can be associated.
- If the Responsibility Center number is not available in the drop down menu of the Purchasing Center and Operating Center fields, click the Magnifying Glass to open the Find Responsibility Center Form.
- Right click in the grid and select New Responsibility Center.
- This will open the New Responsibility Center Form. See Responsibility Center Details.
Manage Responsibility Centers Form
- You can also create and edit Responsibility Center information using the Responsibility Centers Form.
- To open the Responsibility Center Form, click on Navigation: Start > Administer > Finance > Accounting > Responsibility Centers.
- Using this form, you can search and edit existing Responsibility Center information.
- Adding a Responsibility Center: Right click, and select New Responsibility Center.
- This will open the New Responsibility Center Form. See Responsibility Center Details.
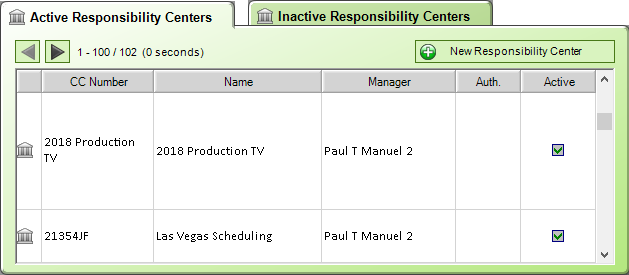
Responsibility Center Status Filters
Both panels contain identical columns and display the same information
Responsibility Centers can classified under one of these two panels based on whether the Active flag is turned on or off.
Icon
Number
Name
Auth.
Active
New Responsibility Center
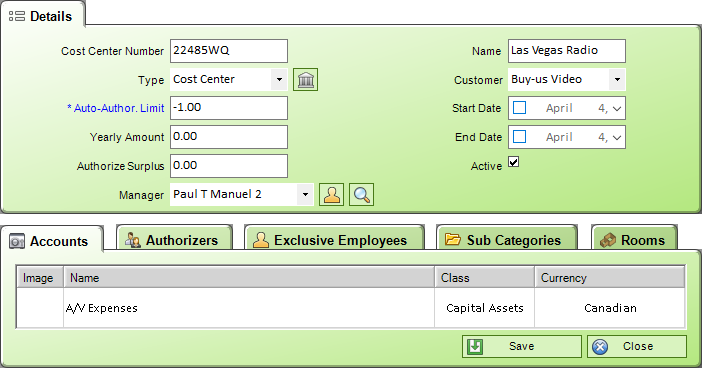
Number
The Responsibility Center number or the Responsibility Center code.
Type
The type of Responsibility Center, for example, Cost Center, Investment Center, Profit Center, Revenue Center.
Auto-Author. Limit
The amount entered into this field determines, at request time, whether or not the Product will be automatically authorized.
Yearly Amount
Displays the amount allocated to this Responsibility Center for the fiscal year.
Authorize Surplus
Displays the amount by which an authorized item’s purchase cost can increase without requiring re-authorization.
Name
The name or description of the Responsibility Center. If there is no name or description, enter the Responsibility Center number again in the Name field.
Customer
Displays a list of Customers that can be linked to the Responsibility Center
Start Date
End Date
Active
The Responsibility Center is active and will be available for use in selection lists.
Accounts
Authorizers
Employees
Sub Categories
Rooms
ADD: Click on the New Cost Center button, or right-click and select New Cost Center from the context menu.
EDIT: Double-click on a Cost Center to open the Accounting form.
DELETE: Right-click on a record and select Delete from the context menu.
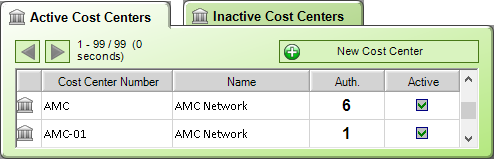
Cost Center Status Filters
In the Accounting form, an Active field determines how Cost Centers are filtered in this form
Active Cost Centers: Cost Centers are deemed Active, as the Active flag is checked.
Inactive Cost Centers: Cost Centers are deemed Inactive, as the Active flag is not checked.
Icon
This image typically represents Cost Centers throughout VimBiz.
Cost Center Number
The number of the Cost Center
This information is administered in the Accounting form.
Name
The name of the Cost Center.
This information is administered in the Accounting form.
Auth.
The number of Employees who are set as Authorizers of the Cost Center.
This information is administered in the Accounting form, under the Authorizers tab.
Active
A checked box indicates that the Cost Center is Active
An unchecked box indicated that the Cost Center is Inactive.
This information is administered in the Accounting form.
New Cost Center
Click this button to create a Cost Center.
Details of this form are set out in the Accounting section.
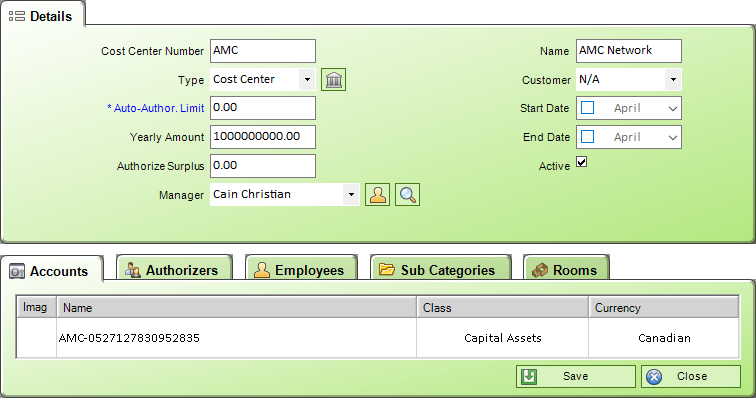
Number
The Cost Center number or the Cost Center code.
Type
The type of Responsibility Center, for example, Cost Center, Investment Center, Profit Center, Revenue Center.
Auto-Author. Limit
The amount entered into this field determines, at request time, whether or not the Product will be automatically authorized.
Yearly Amount
Displays the amount allocated to this Cost Center for the fiscal year.
Authorize Surplus
Displays the amount by which an authorized item’s purchase cost can increase without requiring re-authorization.
Name
The name or description of the Cost Center. If there is no name or description, enter the Cost Center number again in the Name field.
Customer
Displays a list of Customers that can be linked to the Cost Center
Start Date
End Date
Active
Accounts
Authorizers
Employees
Sub Categories
Rooms