Production
Forms
ADD: Click on the New Content button, or right-click and select New Content from the context menu.
EDIT: Double-click on a Content to modify its details.
DELETE: Right-click on an entry and select Delete from the context menu.
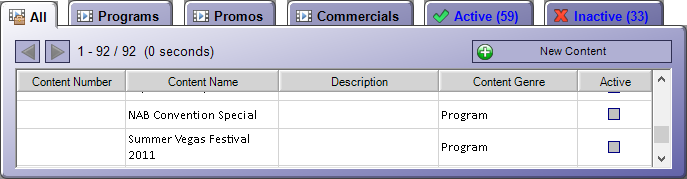
Content Type Filters
Content is filtered by configured attributes on each Content Type.
 All: Lists all Content, no matter the Content Type.
 Programs: Lists all Content with a Program type attribute.
Promos: Lists all Content with a Promo type attribute.
Commercials: Lists all Content with a Commercial type attribute.
Content Types are administered in the Manage Content Types form.
Name
The name of the Content.
Description
A description of the Content.
Category
Content can be classified under a Content Type.
Content Types are administered in the Manage Content Types form.
New Content
Click on this button to create a Content record.
Details
Name: Type a name for the Content
Description: Enter a description of the Content.
Type: Select a Content Type from the drop down list.
Content Types are administered in the Manage Content Types form.
The link between discrepancies and dollars is easy to recognize. Effectively managing on-air and other types of discrepancies saves broadcasting and media companies big money. The VimBiz Discrepancies module is a powerful ally in Discrepancy Reporting and analysis, enabling managers to spot the trends, take action, and prevent issues from ever making it to air. Broadcasters love this. Advertisers love this. Everybody wins. What else does VimBiz Discrepancies provide?
- Detail capture - categorize and report on all the important DR variables related to timing, severity, affected media, source, and content.
- Trend analysis - structured discrepancy data capture enables powerful reporting to spot trends and take corrective action.
- Situational awareness - highly configurable alerts ensure the right people are kept aware of important discrepancy information most relevant to their area of responsibility.
- Make Good power - flags and auto-notifications ensure advertisers are appropriately treated when interruptions or omissions occur.
- Resolution tools - Service Requests and E-Documents can be associated with any discrepancy, providing powerful mechanisms for follow-up, visibility, and resolution.
OVERVIEW: This form is used to record and track discrepancy events.
ADD: Click on the New Discrepancy button, or right-click and select New Discrepancy from the context menu.
EDIT: Double-click on a Discrepancy to open the Production form.
DELETE: Right-click on an entry and select Delete from the context menu.
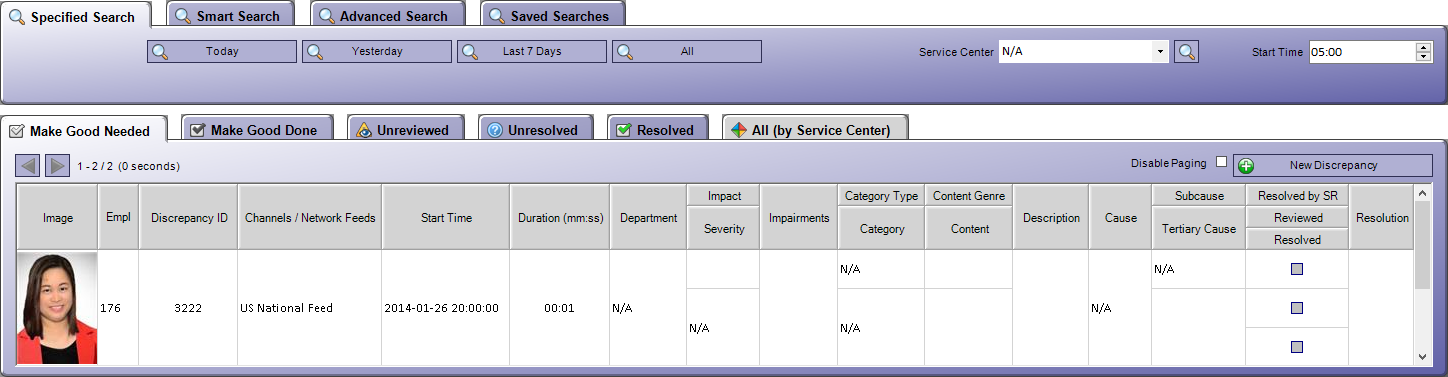
Specified Search
Specific predefined search options allow each user to display only the Discrepancy Records modified within a specified number of days.
Click on one of the Search buttons to view discrepancies modified within a set time frame:
 Today: Displays only entries that have been submitted during the same calendar date.
Yesterday: Displays only entries that were submitted on the previous calendar date.
Last 7 Days: Displays all entries that had been submitted within the past calendar week.
Start Time: Define the earliest hour for which entries will be listed.
For example, if looking for Today's Discrepancies and the Start Time is set to 08:00, any item reported prior to that time will not be listed.
Or click on the All button, which will display a list of ALL records that have ever been submitted.
Discrepancy Attribute Filters
 Make Good Needed: Lists Discrepancies that have been flagged as requiring a Make Good action in the Production form.
 Make Good Done: Lists Discrepancies that have been flagged as having required Make Good actions completed in the Production form.
Follow-up Needed: Lists Discrepancies that have been flagged as requiring a Follow-Up action in the Production form.
Follow-up Done: Lists Discrepancies that have been flagged as having required Follow-Up actions completed in the Production form.
 Unresolved: Lists Discrepancy records that have an Unresolved status, meaning that they require further attention.
 Resolved: Lists Discrepancy records that have a Resolved status.
 All: Lists all Discrepancies, regardless of their status.
Discrepancy Attributes are administered in the Production form.
Employee
Name of the Employee who reported the Discrepancy.
Employees are administered in the Manage Employees form.
Discrepancy ID
When the Discrepancy is created, VimBiz automatically assigns an ID number to the record.
Start Time
The date and time when the Discrepancy began.
Channels / Network Feeds
A list of the Channels and/or Network Feeds that were affected by the Discrepancy.
This list is created in the Production form.
Duration (mm:ss)
The duration of the Discrepancy, in minutes and seconds.
Category Type
The Category Type that is selected to sort the list of Discrepancy Categories.
Category Types are administered in the Discrepancy Category Types form.
Category
The category under which the Discrepancy was filed.
Categories are administered in the Discrepancy Categories form.
Description
A description of the Discrepancy.
This detail is entered in the Production form.
Department
The department responsible for finding a solution to the Discrepancy.
This detail is entered in the Production form.
Content
The type of content that created the Discrepancy.
Content is administered in the Manage Content form.
Source
The source of the content that caused the Discrepancy.
Sources are administered in the Content Sources form.
Severity
Describes the severity of the discrepancy.
Severities are administered in the Manage Severities form.
Resolved
If the box is checked, the Discrepancy has been marked as Resolved.
Discrepancies can be resolved manually or by Service Request.
SR
If there are Service Requests linked to the Discrepancy, a count will appear in this column.
COLOR FLAGS:
0 - This Asset currently has no open Service Requests
# - This Asset currently has (set number of) open Service Requests.
# - This Asset currently has (set number of) open Service Requests, with at least 1 SR making the Asset Out of Operation.
New Discrepancy
Click this button to create a Discrepancy in the Production form.
OVERVIEW: This form is used to record and track discrepancy events.
Notes
Area to create a list of notes regarding the Discrepancy.
ADD: Click on the New Note button, or right-click and select New Note.
EDIT: Double-click on the Note to change its details.
DELETE: Right-click on an entry and select Delete from the context menu.
 Notes
Notes
Employee: Name of the Employee who created the note.
Description: Content of the Note.
Service
Service Requests can be created for those who need to repair the cause of the Discrepancy.
ADD: Click the New Service Request button to create a request in the New Service Request form.
DELETE: Right-click on an entry and select Delete from the context menu.
IMPORTANT: When creating a New Service Request from the New Discrepancy form, many SR fields will be filled in with the related Discrepancy information.
- Reported By = Requested By
- Category = Request (if configured in the Discrepancy Categories form)
- Severity = Priority Type (if configured in the Manage Severities form)
Additionally, certain Discrepancy details will appear in the Service Request notes.
- Follow-Up
- Discrepancy ID
- Category Type
- Category
- Severity
- Content Type
- Content
- Source
- Start Date/Time
- On Air Affected
- Channel / Network Feeds
- Description
Service Requests are administered in the Manage Service Requests form.
 Service Requests
Image: Image of the Product on which service is being requested.
SR #: VimBiz automatically assigns a Service Request Number to a newly-created record.
Requester: Name of the Employee who created the SR.
Area, Room: Area and Room where the Asset is located.
Priority: Priority Type assigned to the Service Request.
Product Type: Type of Product of the Service Request Asset.
Model: Model Number of the Service Request Asset.
Service Request: Name of the Service Request
Service Request Names are administered in the Predefined Service Request form.
Request Notes: If notes were included in the Service Request, they will appear here.
Actions & Solutions: List of Service Actions listed for the Service Requests
Actions are administered in the Predefined Service Actions form.
Assigned To: Name of the Employee to whom the Service Request has been assigned.
Employees are administered in the Manage Employees form.
Status: Status of the Service Request.
This Status will change as the Service Request progresses.
Statuses are administered in the Service Request Statuses form.
IMPORTANT: If the Discrepancy Category has been configured with a Predefined Service Request, creating a new Service Request will select this value by default. Categories are administered in the Discrepancy Categories form.
E-Docs
Link various documents to the Discrepancy Report.
ADD: Click on the Insert New File button, or right-click and select Insert File.
DELETE: Right-click on an entry and select Delete from the context menu.
Related Disc.
Create other Discrepancy reports that are linked to the main Discrepancy.
ADD: Click on the New Discrepancy button
Discrepancy ID
When a Discrepancy is created , VimBiz assigns a number to the new record.
Reported By
Name of the Employee who reported the Discrepancy.
IMPORTANT: This field includes auto-complete functionality - enter a partial name or number and click Enter to select from a filtered list of potential matches.
Employees are administered in the Manage Employees form.
Click on the  button to view the Employee's Details.
Click on the button to find another employee.
Start Date / Time
Enter the date and time when the discrepancy began.
Click on the arrow to view a calendar, then type the time (hours : minutes : seconds)
End Date / Time
Enter the date and time when the discrepancy ended.
Click on the arrow to view a calendar, then type the time (hours : minutes : seconds)
Duration
The duration will automatically be calculated by VimBiz, based on the difference between the start and end times.
Check the Time Approx. box to indicate that the Start Time, End Time, and Duration is approximate values.
On Air Affected
Check this box to flag that the Discrepancy was heard or seen by the audience.
Sched. Log Time
Enter the date and time when the Discrepancy is entered in the Schedule Log.
Category Type
Select a Category Type to define the list of Categories in the next field.
Type the Category Type Name in the box, or click on the arrow to select an entry in the drop-down list.
IMPORTANT: This field includes auto-complete functionality - enter a partial name and click Enter to select from a filtered list of potential matches.
Category Types are administered in the Discrepancy Category Types form.
Category
Categorize the type of Discrepancy being reported.
The list in the drop-down list is filtered by the selected Category Type, set in the previous field.
Category Types can be configured with a default Category; in this case, the default value will appear in this field.
Type a Category Name in the box, or click on the arrow to view a list.
IMPORTANT: This field includes auto-complete functionality - enter a partial name or number and click Enter to select from a filtered list of potential matches.
Categories are administered in the Discrepancy Categories form.
Severity
Describe the severity of the discrepancy.
Type the Severity Name in the box, or click on the arrow to view a list.
Severities are administered in the Manage Severities form.
IMPORTANT: A Company Setting will determine whether or not this field is linked to the On-Air Affected field.
When this setting is set to True, the Severity field on a New Discrepancy will only be enabled when On-Air Affected is selected.
Ext. Ref. #
Enter the reference number from an external logging system, if applicable.
Description
Enter additional details about the Discrepancy that have not been captured by the other fields.
Content Type
Enter the type of Content that was being broadcast during the Discrepancy.
Type the type in the box, or click on the arrow to view a list.
Content Types are administered in the Manage Content Types form.
Content
Enter the Content of the Program that was being broadcast during the Discrepancy.
Type the Content in the box, or click on the arrow to view a list.
If the entered Content is not in the list, users will be offered the option to save their entry.
Content is administered in the Manage Content form.
Click on the button to view the details of the selected content.
Click on the button to find other content.
Media Asset #
Area to enter the Asset Number tied to the related Media Asset, when applicable.
Material ID
Unique series of numbers and/or letters that identifies the type of material.
Timecode
Displays the program's time code reading, which represents the beginning point of the Discrepancy.
Make Good Needed / Make Good Done
Make Good Needed
Check this box to flag that a Make Good is required for the Discrepancy.
This will file the Discrepancy under the Make Good Needed tab in the Production form.
This will also send an e-mail to all Employees who are set to receive Make Good e-mails in the Discrepancy Emails form.
Make Good Done
Check this box to flag that a Make Good has been completed for the Discrepancy.
This will file the Discrepancy under the Make Good Done tab in the Production form.
Follow-Up Needed / Follow-Up Done
Follow-Up Needed
Check this box to flag that an additional follow-up is required for the Discrepancy.
This will file the Discrepancy under the Require Follow-up tab in the Production form.
Follow-Up Done
Check this box to indicate that all Follow-Up is complete for the Discrepancy.
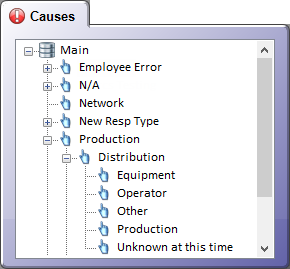
Cause
Determine the cause of the Discrepancy.
Type the Cause in the box, or click on the arrow to view a list.
IMPORTANT: This field includes auto-complete functionality - enter a partial name or number and click Enter to select from a filtered list of potential matches.
Causes are administered in the Manage Causes form.
Department
Link the Discrepancy to a Department.
Type the Department Name in the box, or click on the arrow to view a list.
Departments are administered in the Departments form.
Only Departments with an active Discrepancies flag will be selectable.
Resolve by SR / Resolved
Check the Resolved box to flag that the Discrepancy has been resolved.
Leave the box unchecked to indicate that the Discrepancy remains unresolved.
IMPORTANT: When a Service Request is linked to a Discrepancy, the Resolved by SR box will also be used.
Creating the Service Request will automatically check off the Resolved by SR box, to flag users that a Service Request is related.
Setting the Service Request Status to a Closed-type status will automatically check of the Resolved box, to flag the user that the Service Request has been solved.
Service Requests are administered in the Manage Service Requests form.
Service Request Status are configured for each Service Center in the Service Center Details form.
Resolution
Type notes in this field on the Resolution.
IMPORTANT: If a resolution is entered here, and the Resolved flag is not checked, the user will be prompted upon exiting the form.
IMPORTANT: When a Service Request is linked to a Discrepancy, notes entered as the SR Solution will appear here.
Service Requests are administered in the Manage Service Requests form.
Channel / Network Feeds
Create a list of all Channels and/or Network feeds that were affected by the Discrepancy.
ADD: Click on the  button to select from a list of Feeds.
IMPORTANT: If no Channel / Network Feeds are selected, the user will be reminded when saving the Discrepancy.
Feeds are administered in the Network Feeds form.
Here, an Active flag will determine which Feeds appear under the Active and Inactive tabs.
REPORT: Discrepancy
Click this button to open the Discrepancy report.
ADD: Click on the New Production Journal button to create a blank Production Journal.
Right-click on a record and select New Production Journal from the context menu; this will create a Production Journal for the related Program.
EDIT: Double-click on a Production Journal to open the Production form.
DELETE: Right-click on an entry and select Delete from the context menu.

View Report
Click this button to view the Production Discrepancies by Dates report.
Browse Prod. Journ. Disc.
Click on this button to open the Production form.
Here, users will be able to view all Discrepancies that are linked to Production Journals.
Double-clicking on a record will open the Production form.
New Production Journal
Click on this button to create a new Production Journal.
Complete details of this form are found in the Production section.
ID
When a Production Journal is created , VimBiz assigns a number to the new record.
Project
Name of the Project linked to the Production Journal.
Production Projects are administered in the Manage Production Projects form.
Engineering Projects are administered in the Manage Projects form.
Program
Name of the Program that was affected by the Discrepancy.
Programs are administered in the Manage Content form.
Tech. Manager
Name of the Employee who is the Technical Manager for the affected Program.
Employees are administered in the Manage Employees form.
Start Date
The date and time when the Production begins.
End Date
The date and time when the Production ends.
Live Production
When this box is checked, it is to indicate that the Production is live.
Critical
When this box is checked, it is to indicate that the Production Journal is Critical for Broadcast.
Service Center
Name of the Service Center responsible for overseeing work related to the Discrepancy.
Service Centers are administered in the Service Centers form.
Facilities
Name of the Facilities that are used for the Production.
Facilities are administered in the Facilities form.
SR
Indicates whether or not there are Service Requests linked to the related Discrepancies for each Production Journal.
COLORS:
White: Indicates that there are no Service Requests
The cell will display the number 0.
Green: Indicates that all the Service Requests linked to the Discrepancy have a Closed-type Status.
The cell will display the number 0.
Yellow: Indicates that some the Service Requests linked to the Discrepancy have a Closed-type Status, and that others remain Unresolved.
The cell will display the number of Service Requests that remain Unresolved.
Red: Indicates that all Service Requests that are linked to the Discrepancy remain Unresolved.
The cell will display the number of Service Requests that remain Unresolved.
Service Request Statuses are administered per Service Center, in the Service Center Details form.
Service Requests are administered in the Manage Service Requests form.
SRs are linked to Discrepancies in the Production form.
Notes
Area to create a list of notes regarding the Discrepancy.
ADD: Click on the New Note button, or right-click and select New Note.
EDIT: Double-click on the Note to change its details.
DELETE: Right-click on an entry and select Delete from the context menu.
Notes
Employee: Name of the Employee who created the note.
Description: Content of the Note.
Service Requests
Service Requests can be created for those who need to repair the cause of the Discrepancy.
Service Requests are administered in the Manage Service Requests form.
ADD: Click the New Service Request button to create a request in the New Service Request form.
EDIT: Right-click on the related SR and select Refresh Request Notes
Selecting this option will clear all Service Request Notes, and replace them with the Discrepancy Description.
IMPORTANT: This will flag the updated Service Request as unacknowledged in the Service Coordinator and Manage My Service Requests forms.
DELETE: Right-click on an entry and select Delete from the context menu.
Service Requests
Image: Image of the Product on which service is being requested.
SR #:VimBiz automatically assigns a Service Request Number to a newly-created record.
Requester: Name of the Employee who created the SR.
Area, Room: Area and Room where the Asset is located.
Priority: Priority Type assigned to the Service Request.
Product Type: Type of Product of the Service Request Asset.
Model: Model Number of the Service Request Asset.
Service Request: Name of the Service Request
Service Request Names are administered in the Predefined Service Request form.
Request Notes: If notes were included in the Service Request, they will appear here.
Actions & Solutions: List of Service Actions listed for the Service Requests
Actions are administered in the Predefined Service Actions form.
Assigned To: Name of the Employee to whom the Service Request has been assigned.
Employees are administered in the Manage Employees form.
Status: Status of the Service Request.
This Status will change as the Service Request progresses.
Statuses are administered in the Service Request Statuses form.
E-Documents
Link various documents to the Discrepancy Report.
ADD: Click on the Insert New File button, or right-click and select Insert File.
DELETE: Right-click on an entry and select Delete from the context menu.
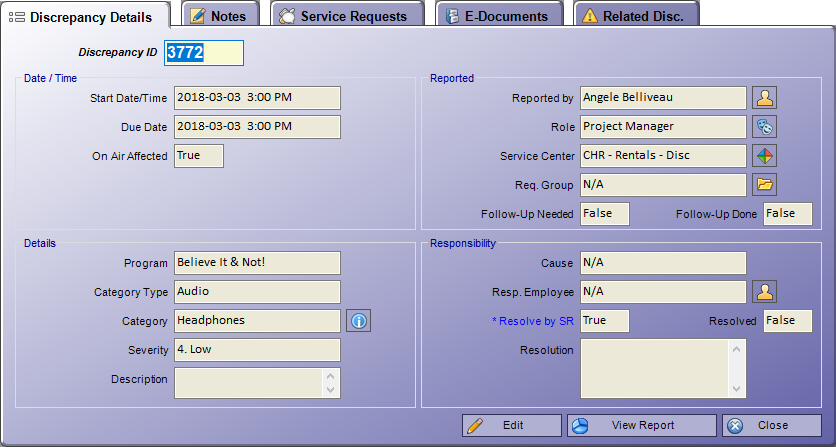
Related Disc.
Create other Discrepancy reports that are linked to the main Discrepancy.
ADD:
Click on the New Discrepancy button; this will open the Production form.
Click on the New Prod. Journ. Disc. button; this will open the Production form.
Discrepancy ID
When a discrepancy is created , VimBiz assigns a number to the new record.
Start Date/Time
Enter the date and time when the discrepancy began.
Click on the arrow to view a calendar, then type the time (hours : minutes : seconds)
Due Date
Enter the date and time when the discrepancy is due.
Click on the arrow to view a calendar, then type the time (hours : minutes : seconds)
On Air Affected
Check this box to flag that the Discrepancy was heard or seen by the audience.
IMPORTANT: Categories can be configured with an On Air Affected attribute.
When the selected category has this attribute, this checkbox will be checked by default.
Categories are administered in the Discrepancy Categories form.
Program
Name of the Programs that is linked to the Production Journal.
This field is read-only, and cannot be modified.
Programs are linked to Production Journals in the Production form.
Category Type
Select a Category Type to define the list of Categories in the next field.
Type the Category Type Name in the box, or click on the arrow to select an entry in the drop-down list.
IMPORTANT: This field includes auto-complete functionality - enter a partial name and click Enter to select from a filtered list of potential matches.
Category Types are administered in the Discrepancy Category Types form.
Category
Categorize the type of Discrepancy being reported.
The list in the drop-down list is filtered by the selected Category Type, set in the previous field.
Category Types can be configured with a default Category; in this case, the default value will appear in this field.
Type a Category Name in the box, or click on the arrow to view a list.
IMPORTANT: This field includes auto-complete functionality - enter a partial name or number and click Enter to select from a filtered list of potential matches.
Categories are administered in the Discrepancy Categories form.
Severity
Describe the severity of the discrepancy.
Type the Severity Name in the box, or click on the arrow to view a list.
Severities are administered in the Manage Severities form.
Description
Enter additional details about the Discrepancy that have not been captured by the other fields.
Reported by
Name of the Employee who reported the Discrepancy.
IMPORTANT: This field includes auto-complete functionality - enter a partial name or number and click Enter to select from a filtered list of potential matches.
Employees are administered in the Manage Employees form.
Click on the button to view the Employee's Details.
Click on the button to find another employee.
Role
The Role that the Reported by Employee was performing when creating the Discrepancy.
Roles are administered in the Roles form.
Roles are linked to Employees in the Employee Details form.
Service Center
Name of the Service Center responsible for overseeing work related to the Discrepancy.
Service Centers are administered in the Service Centers form.
Click on the button to view the Service Center Details.
Req. Group
Optionally include a group of Employees in Service Request-related e-mails
Type the Group Name in the box, or click on the arrow and select a Group from the drop-down list.
Request Groups are administered in the Manage Employee Groups form.
Click on the  button to view the details of the selected group.
Click on the button to find another group.
Follow-Up Needed / Done
Follow-Up Needed
Check this box to flag that an additional follow-up is required for the Discrepancy.
This will file the Discrepancy under the Require Follow-up tab in the Production form.
Follow-Up Done
Check this box to indicate that all Follow-Up is complete for the Discrepancy.
Cause
Determine the cause of the Discrepancy.
Type the Cause in the box, or click on the arrow to view a list.
IMPORTANT: This field includes auto-complete functionality - enter a partial name or number and click Enter to select from a filtered list of potential matches.
Causes are administered in the Manage Causes form.
Resp. Employee
If applicable, identify the Employee who was responsible for the Discrepancy.
Employees are administered in the Manage Employees form.
Click on the button to find an employee.
Click on the button to view the Employee's Details.
IMPORTANT: When a Service Request is linked to a Discrepancy, the Service Request Owner will be shown in this field.
When the Owner changes, the Responsible Employee will also be updated.
Service Requests are administered in the Manage Service Requests form.
Resolve by SR / Resolved
Check the Resolved box to flag that the Discrepancy has been resolved.
Leave the box unchecked to indicate that the Discrepancy remains unresolved.
IMPORTANT: When a Service Request is linked to a Discrepancy, the Resolved by SR box will also be used.
Creating the Service Request will automatically check off the Resolved by SR box, to flag users that a Service Request is related.
Setting the Service Request Status to a Closed-type status will automatically check of the Resolved box, to flag the user that the Service Request has been solved.
Service Requests are administered in the Manage Service Requests form.
Service Request Status are configured for each Service Center in the Service Center Details form.
Resolution
Type notes in this field on the Resolution.
IMPORTANT: If a resolution is entered here, and the Resolved flag is not checked, the user will be prompted upon exiting the form.
IMPORTANT: When a Service Request is linked to a Discrepancy, notes entered as the SR Solution will appear here.
Service Requests are administered in the Manage Service Requests form.
New Service Request
Click on this button to create a Service Request in the New Service Request form.
IMPORTANT: When creating a New Service Request from the New Discrepancy form, many SR fields will be filled in with the related Discrepancy information.
- Reported By = Requested By
- Category = Request (if configured in the Discrepancy Categories form)
- Severity = Priority Type (if configured in the Manage Severities form)
Additionally, certain Discrepancy details will appear in the Service Request notes.
- Follow-Up
- Discrepancy ID
- Content Type
- Content
- Source
- Start Date/Time
- On Air Affected
- Description
REPORT: Discrepancy
Click this button to view the Discrepancy report.
OVERVIEW: The Manage Master Projects section regroups all Master Projects by Scheduling Statuses, and allows users to view details.
ADD: Click on the New Master Project button or right-click in the list and select the New Master Project option.
EDIT: Double-click on the selected Project.
DELETE: Select the entry to be deleted, right-click, and choose the Delete option.

Project Status Filters
When a Scheduling Status is created with certain attributes, it is organized under the following filters.
Project Statuses are administered in the Scheduling Statuses form.
 Planning: Events are in their planning stage and can be displayed with a distinct color.
 Confirmed: Events have been visually completed, by using a distinct color.
Active: Events are being worked on, in the planning stage, or await finalization.
Completed: Events have been visually completed, by using a distinct color.
 All: Lists all Master Projects, no matter their Status Filter.
Project Number
Assign an internal reference number for the Master Project.
Name
Name for the Master Project, as it will appear in the Resource Scheduler.
Customer
Name of the customer requesting this particular project.
Assigning a customer to a project will ensure that all invoiced costs be tracked in their Customer Profile.
Customers are administered in the Manage Customers form.
Status
Status of the Master Project, which can be modified at any time.
Production Projects created under a Master Project will inherit this status value by default.
These statuses are administered in the Scheduling Statuses form.
New Master Project
Click this button to create a Master Project.
 Master Project Details
Number: An internal reference number for the Master Project.
Name: Name for the Master Project, as it will appear in the Resource Scheduler.
Customer: Customer requesting the Project. Click the  button to view the Customer's Details, or to find another client.
Status:Scheduling Status of the Master Project. Click the  button to view the Status details.
Created By: Name of employee who has created the Master Project. Click the button to view the Employee's Details, or to find another employee.
Notes: Area for leaving notes regarding the Master Project (editable).
OVERVIEW: The Manage Production Projects form is the easiest way to filter and find Production Projects in VimBiz.
ADD: Click on the New Production Project button, or right-click in the list and select the New Production Project option.
EDIT: Double-click a record in the grid to open the Production form.
DELETE: Select the entry to be deleted, right-click, and choose the Delete option.

- All the tabs contain the same information, but are filtered for the different statuses; for example, the All tab shows ALL Production Projects.
- All the tabs also have the same data fields in their summary grids.
Project Status Filters
When a Scheduling Status is created with certain attributes, it is organized under one of the following filters.
Project Statuses are administered in the Scheduling Statuses form.
Planning: Events are in their planning stage and can be displayed with a distinct color.
Active: Events are usually currently worked on, in planning stage or have just passed but haven't been finalized yet.
 Paused: Events have been halted and can be displayed with a distinct color.
Completed: Events have been visually completed, by using a distinct color.
 Canceled: When an existing event is Cancelled, further actions are triggered in VimBiz to reflect the cancellation. For instance, the schedule of an employee that was assigned to a role in that Facility Booking will be modified accordingly to reflect the Facility Booking cancellation.
 External: Production projects that are imported from an external system or database into the VimBiz infrastructure.
 My Projects: Will display all projects that have been created by the user Employee. The user's name will appear in the Employee field on the Production form.
All - Not Finalized: Displays the complete list of production projects, no matter their project status filters., with the exception of Finalized projects
Project Number
Unique identifier of Production Project.
By default, this field is a combination of the "VIM-" prefix and the VimBiz
Project ID field, but it can be replaced by a project ID coming from an external system.
Description
Production Project Name, as it will appear in the Resource Scheduler form's Project Tree.
Customer
The customer who has requested the Project.
Customers are administered in the Manage Customers form.
Cost Center
The Cost Center that has been selected to track all Project-related costs.
Cost Centers are administered in the Cost Centers form.
Amount
The amount originally budgeted for the Project.
This information is entered in the Production form.
Baseline
Displays the Baseline Cost of the Production Project.
This cost is saved in time when a Production Project is saved as a Baseline Agreement.
This information is entered in the Production form.
New Production Project
Click this button to create a Production Project.
Consult the Production for complete details of this form.
OVERVIEW: The Browse Full Production Project Details form is a read-only version of the Production form. It allows a quick view of a projects by status filters, displays customer and cost information, and is especially helpful to those planning and producing events.
- This section contains the same information as the Production form, with identical functionalities.
- Likewise, double-clicking on any Production Project will open the Production form , and further details can be revealed via various tabs, but cannot be altered.
Details
Consult the Production for information on the fields found under this tab.
Financial Summary
Financial information on the Project is listed under this tab.
Financial Summary
Baseline Cost: Displays the Baseline Cost of the Production Project, in a read-only field.
ADD: Enter a Budgeted Amount under the Production tab.
In the bottom panel, click on the Create Baseline project.
Once a Baseline has been created , click the button to open the Scheduled Costs By Project report.
Scheduled Cost: Sum of the Project's Costs: Facilities, Roles, Employees, Rentals, Products and Service.
Percent Difference: The difference between the Actual Cost and the Baseline Cost of the Production Project, in a read-only field.
Other
Area to assign an image to the Project.
This image is specifically used to identify the Project in the Manage Rentals and other Rentals forms.
Project Image: Select an image that represents the Project
ADD / EDIT: Double-click on the grey square and insert an image from your computer.
VIEW: Right-click on the image and select Open Preview Image from the context menu.
DELETE: Right-click on the image and select Delete from the context menu.
Employees
All employees listed under this tab will have privileged access to the project (when a project has a status with a private or restricted attribute).
If no employees are listed under this tab, all employees will have access to the Project.
ADD: Right-click and select Manage Project Employees from the context menu.
DELETE: Right-click on an entry and select Delete from the context menu.
Employees
Image: Photograph or image representing the Employee
Full Name: Employee's complete name
Department: Department to which the Employee is assigned
Departments are administered in the Departments form.
Title Client: Title assigned to the Employee
Titles are administered in the Employee Titles form.
Business Phone: Telephone number where the employee can be reached at the workplace.
Cellular Phone: Telephone number where the employee can be reached outside the workplace.
Employees are administered in the Manage Employees form.
All listed information is entered in the Employee Details form.
Invoices
Invoice can be generated including all costs associated to Production Project.
ADD: Click on the Generate Invoice button.
EDIT: Double-click on an Invoice to modify its details.
DELETE: Right-click on an entry and select Delete from the context menu.
 Invoices
Invoice #:VimBiz automatically assigns a number to an invoice when it is created.
Customer: Name of the Customer who is being invoiced.
Customers are administered in the Manage Customers form.
PO Number: When the Invoice is generated from a Purchase Order (PO), the number will appear here.
POs are administered in the Purchase Orders form.
Employee: Name of the Employee who created the Invoice.
Employees are administered in the Manage Employees form.
Invoice Date: Date and Time when the Invoice was created.
Total: The total charged in the Invoice.
Quote: Check this box to indicate that a Quote was created from the Invoice.
Quote Sent: Check this box to indicate that the created Quote was sent to the Customer.
PO Received: Check this box to indicate that a Purchase Order (PO) has been received for this Invoice.
Invoice Sent: Check this box to indicate that the Invoice has been sent to the Customer.
Payment Received: Check this box to indicate that payment has been received from the Customer.
Receivable: Check this box to indicate that the payment has been entered into the accounting system as a receivable.
Valid: Check this box to flag that the Invoice remains valid.
Invoices are administered in the Manage Invoices form.
All listed information is entered in the Invoice Details form.
E-Documents
Lists all documents pertaining to the project, which can be inserted by clicking on the Insert Files button or by dragging and dropping them from the file system to the area below the tab.
Project Tasks
List of all Project Tasks linked to the Production Project.
 Project Task
Project Task #:VimBiz automatically assigns a number to a newly created Project Task.
Name: Name assigned to the Project Task
Customer: Name of the Customer who has requested the Project Task.
Customers are administered in the Manage Customers form.
Project #: Number of the Production Project associated with the Project Task.
Cost Center: Name of the Cost Center assigned to the Project Task.
Cost Centers are administered in the Cost Centers form.
Producer: Name of the Employee who will be the Producer for the Project Task.
Director: Name of the Employee who will be the Director for the Project Task.
Employees are administered in the Manage Employees form.
Status: Scheduling Status of the Project Task.
Statuses are administered in the Scheduling Statuses form.
Project Tasks are administered in the Production form.
All listed information is entered in the Production form.
IMPORTANT: This list will be used as a filter in various forms throughout VimBiz
When a Project is selected, only project-related Project Tasks will be selectable.
Scheduled Events
Complete list of all related events, whether Employee, Facility or Role Type Events.
 Scheduled Events
Resource Type: Indicated whether the Event is for a Facility a Role, or an Employee.
Resource Name: The name of the Employee, Facility or Role.
Facilities are administered in the Facilities form.
Employees are administered in the Manage Employees form.
Roles are administered in the Roles form.
Linked Event: In the case of a Role Event that is linked to a Facility Booking, the term True will appear in this area.
Role Events are created in the Schedule Event Details form.
Start Time: Date and Time when the event is scheduled to begin.
End Time: Date and Time when the event is scheduled to end.
Facility and Role Type Events are administered in the Resource Scheduler form.
Employee Events are administered in the Employee Schedule form.
Employee Events
List of employee events that will be charged back to the project client.
When the Schedule Event's Billable flag is activated, that event's details will appear under this panel.
Employee Events
Employee: Name of the Employee scheduled to work for the Project.
Employees are administered in the Manage Employees form.
Start: Start Time of the Scheduled Event.
End Time: End Time of the Scheduled Event.
Duration: Duration of the Scheduled Event, which is calculated based on the Start and End Times.
Role: Role that the Employee will perform during the Scheduled Event.
Roles are administered in the Roles form.
Event Type: Abbreviation of the Event Type of the Scheduled Event.
Event Types are administered in the Schedule Event Types form.
CC: Cost Center where the Employee's costs will be charged.
Cost Centers are administered in the Cost Centers form.
Facility Events
List of facility bookings that will be charged back to the project client.
When the Schedule Event's Billable flag is activated, that event's details will appear under this panel.
 Facility Events
Name: Name of the Facility where an Event is scheduled for the Project.
Start Time: Start Time of the Scheduled Event.
End Time: End Time of the Scheduled Event.
Duration: Duration of the Scheduled Event.
Status:Scheduling Status of the Facility Event.
Products Used
List of products that are to be used during the Production Project.
Products are administered in the Manage Product Catalog form.
ADD: Right-click and select Add Products from the context menu.
EDIT: Double-click on a field to type an alternate value or to select one from a drop-down list.
DELETE: Right-click and select Delete from the context menu.
 Products Used
Thumbnail: Image of the Product
Manufacturer, Model, Type, Description: Key details on the Product, as entered in the Product Details form.
Additional Notes: Area to enter notes on the Project Product.
Seller CC: The Cost Center where your company will track expenses related to the Project's Products.
Buyer Acc.: The Account from which the Buyer will take funds to cover product-related expenses.
Seller Acc: The Account in which the Seller will receive funds from product-related expenses.
Price: The Price charged to the Buyer for use of the Product.
Qty: The Quantity of Products being used.
Date: The date when the Products were used.
Finalized: Check the box to indicate the the billing for Products Used has been finalized.
Exported: If project-related costs are exported to a secondary system, this box will be checked once the export has been completed.
Rentals
All Rentals that are linked to the Production Project will be listed under this tab.
ADD: There are 3 ways to add a Rental Request or Rental Booking to a Project:
- Click on the Manage My Rental Requests button to link an existing Rental Request.
- Click on the New Rental Request button to create a Rental Request.
- Right-click and select New Rental from the context menu to create a New Rental Booking.
- Right-click on an existing Rental and select Clone Rental from the context menu to create an identical rental for another date.
Rentals are administered in the Manage Rentals form.
Rental Requests are administered in the Manage Rental Requests form.
EDIT: Double-click on an entry to open the Rental Details form.
DELETE: Right-click and select Delete from the context menu
 Rentals
Status: The status of the Rental Contract.
Rental ID: The Rental Number that is automatically assigned by VimBiz.
External Ref.: An additional reference number that can optionally be entered by the user.
Customer: The name of the Customer to whom items are being rented.
The default value of this field will be the Customer associated with the Project.
Employee: The Employee who created the Rental Contract
Notes: If additional notes were entered in the Rental Details form, they will appear here.
Check Out Time: The date and time when the Rental is slated to be checked out.
Requested: The number of items requested for the Rental.
Booked: The number of items that have been booked for the Rental.
Resolved: When all items have been booked, this box will be checked to indicated that the Rental is complete.
Service
All Service Requests that are linked to the Production Project will be listed under this tab.
Service Requests are administered in the Manage Service Requests form.
ADD: Click on the New Service Request button to create a rental in the New Service Request form.
EDIT: Double-click on an entry to open the Service Request Details form.
DELETE: Right-click on an entry and select Delete from the context menu.
 Service
Image: Picture or Image of the Asset to be serviced.
SR #: When a Service Request is created in the New Service Request form, VimBiz assigns a number to the new record.
Green numbers flag that the Service Request remains active, Red numbers warn that there are other issues with the selected Asset, and Black numbers indicate that the Service Request has been closed.
Requester: Name of the Employee who has created the Service Request.
Employees are administered in the Manage Employees form.
Area, Room: The Area and Room where the Service Request is to be completed.
Locations are administered in the Manage Rooms form.
Priority: Priority that has been assigned to the Service Request.
Priorities are administered in the Priority Types form.
Product Type: Type of the Product related to the Asset that is being reported for service.
Model: Model of the Product related to the Asset that is being reported for service.
Products are administered in the Manage Product Catalog form.
Service Request: Name of the Predefined Service Request that has been assigned.
Service Requests are administered in the Predefined Service Requests form.
Request Notes: Notes that were added to the Service Request Details form.
Actions & Solutions: List of actions that were assigned in the Service Request Details form.
Actions are administered in the Manage Predefined Service Actions form.
Assigned To: Name of the Employee to whom the Service Request has been assigned.
Employees are administered in the Manage Employees form.
Status: Status of the Service Request.
Statuses are administered in the Service Request Statuses form.
Date Requested: Date and Time when the Service Request was created in the New Service Request form.
Service Requests are administered in the Service module.
Reports
Schedule Costs by Project
Click the button to open the Schedule Costs by Project report.
This report includes an option to e-mail a copy to any Employees or Contacts
Employee e-mail addresses are administered in the Employee Details form.
Contact e-mail addresses are administered in the Contact Details form.
Schedule Costs and Actual by Project
Click the button to open the Schedule Costs and Actual by Project report.
This report is similar to the Schedule Costs by Project report, but includes the Actual time claimed in the Employee's Timecards.
This report includes an option to e-mail a copy to any Employees or Contacts
Employee e-mail addresses are administered in the Employee Details form.
Contact e-mail addresses are administered in the Contact Details form.
Create Baseline
A Baseline Agreement is the stamping in time of all Project-related costs.
This operation can only be done once per Project.
ADD: Click the  button to create a Project Baseline and populate the Baseline Cost cell.
If the button is grey and unselectable, a baseline has previously been created.
VimBiz Project ID
Internal VimBiz Production Project unique ID.
This value cannot be modified.
Color
Events will use this color as their background color in the Resource Scheduler form if the Settings are set to use the Production Projects.
EDIT: Click in the box to open a Color form, where one of many colors can be selected.
Master Project
Production Project can optionally be linked to a Master Project.
Type the Project Name in the box, or click on the arrow to view a list.
This field will automatically be populated if the Production Project is created under a Master Project in the Resource Scheduler form.
Master Projects are administered in the Manage Master Projects form.
Clicking on the  button to view details on the Master Project
To find a master project that is not in the list, click the button.
Content
Production Projects can be optionally linked to Content.
Content is administered in the Manage Content form.
ADD: Create a relationship in the Resource Scheduler form, under the Content tab
Click on the (...) button to view details of the selected Content.
To find another Content, click the button.
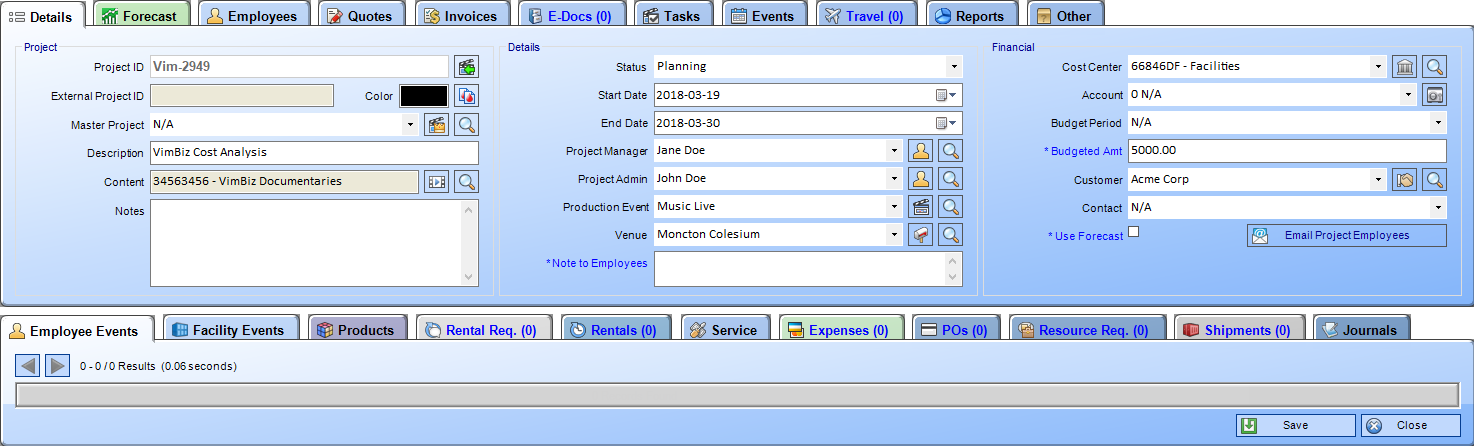
Project ID
Unique identifier of Production Project.
By default, this field is a combination of the "VIM-" prefix and the VimBiz Project ID field, but can be changed.
NOTE: If this number is linked to an imported project, it cannot be modified.
Click the button to open the Find External Production Project form.
Companies importing Project information from an external system will be able to merge Imported Project with projects created in VimBiz.
Imported Projects will be marked as such, under the Other tab.
Description
Production Project Name, as it will appear in the Resource Scheduler's Project Tree.
Type the name of the Project in this field.
Notes
Allows users to type any additional information pertaining to the project.
Status
The Production Project's Scheduling Status.
Type the Status Name in the box, or click on the arrow to view a list.
Scheduling Statuses are administered in the Scheduling Statuses form.
Start Date
Date when the Project is scheduled to begin.
Click the arrow in the field to access the drop down calendar and click on the appropriate date.
End Date
Date when the Project is scheduled to end.
Click the arrow in the field to access the drop down calendar and click on the appropriate date.
IMPORTANT: This is a read-only field- users cannot modify the End Date of a Project.
IMPORTANT: Companies can configure a VimBiz Notification, which will notify the Project Manager when the Project End Date is approaching.
Contact Vimsoft for complete details on configuring this notification.
Project Manager
The Employee who manage the Project.
Type the Employee Name in the box, or click on the arrow to view a list.
Employees are administered in the Manage Employees form.
Click the button to view details on the selected Employee.
To find an employee that is not in the list, click the button.
Employee
Displays the name of the employee who created the Production Project (read only).
Note to Employees
Allows users to type special information pertaining to the project.
These notes will appear in the Team Scheduler form for all Employees assigned to the Project.
Cost Center
The name of the Cost Center associated with the Production Project.
Type the Cost Center Name in the box, or click on the arrow to view a list.
Cost Centers are administered in the Cost Centers form.
Click on the  button to view details of the selected cost center .
To find a Cost Center that is not in the list, click the button .
Account
The Account tied to the Cost Center where Projects costs are charged.
Type the Account Name in the box, or click on the arrow to view a list.
Accounts are managed in the Accounts form.
Accounts are linked to Cost Centers in the Cost Center Details form.
Click on the  button to view details of the selected account.
Budget Period
Displays the budget period associated to the Production Project record.
Type the Budget Period Name in the box, or click on the arrow to view a list.
Budget Periods are defined in the Budget Periods form.
Budgeted Amt
Allows the User to enter a budget amount for the entire Production Project.
This number will be used to create the Baseline Agreement.
Customer
Name of the customer who requested the Project.
Type the Customer Name in the box, or click on the arrow to view a list.
Customers are administered in the Manage Customers form.
Click on the button to view details of the selected customer.
To find a Customer that is not in the list, click the button .
External Project ID
If the Production Project has been imported from an external system, the related Project ID will appear in this field.
OVERVIEW: The Manage Project Tasks form is the easiest way to filter and find Project Tasks in VimBiz. Double click a record in the grid to open the Project Task Details form.
ADD: Click on the New Project Task button or right-click in the list and select the New Project Task option.
EDIT: Double-click a record in the grid to open the Production form
DELETE: Select the entry to be deleted, right-click, and choose the Delete option.

- All the tabs contain the same information, but are filtered for the different statuses; the All tab shows ALL Project Tasks.
- All the tabs have the same data fields in their summary grids.
Project Task Filters
When a Scheduling Status is created with certain attributes, it is organized under the following filters.
Project Statuses are administered in the Scheduling Statuses form
Planning: Events are in their planning stage and can be displayed with a distinct color.
Confirmed: Events have been visually completed, by using a distinct color.
Active: Events are usually currently worked on, in planning stage or have just passed but haven't been finalized yet.
Canceled: When an existing event is Cancelled, further actions are triggered in VimBiz to reflect the cancellation. For instance, the schedule of an employee that was assigned to a role in that Facility Booking will be modified accordingly to reflect the Facility Booking cancellation.
Completed: Events have been visually completed, by using a distinct color.
All: Displays the complete list of project tasks, no matter their project status filters.
Project Task #
The number used in the Project Task ID (default); can be modified as per company standards.
Name
The Project Task name, as it will appear in the Resource Scheduler form.
Task Type
Project Tasks can be grouped by Types, for reporting purposes.
Displays the name of the related Project Task Type.
Project #
Project Tasks are linked to Production.
The number of the related Production Project will appear here.
If the Project Task is independent, N/A will appear here.
Project Name
Project Tasks are linked to Production Projects.
The name of the related Production will appear here.
If the Project Task is independent, N/A will appear here.
Content #
Project Tasks are linked to Production Projects, and Projects can optionally be linked to Content.
The number of the related Content will appear here.
Content Name
Project Tasks are linked to Production Projects, and Projects can optionally be linked to Content.
The name of the related Content will appear here.
Cost Center
Cost Center where all Project Task-related costs will be affected.
Producer
The Employee fulfilling the role of Producer.
Director
The Employee fulfilling the role of Director.
Customer
The Project Task customer.
Status
Assigned Project Task Status.
New Project Task
Click this button to create a Project Task.
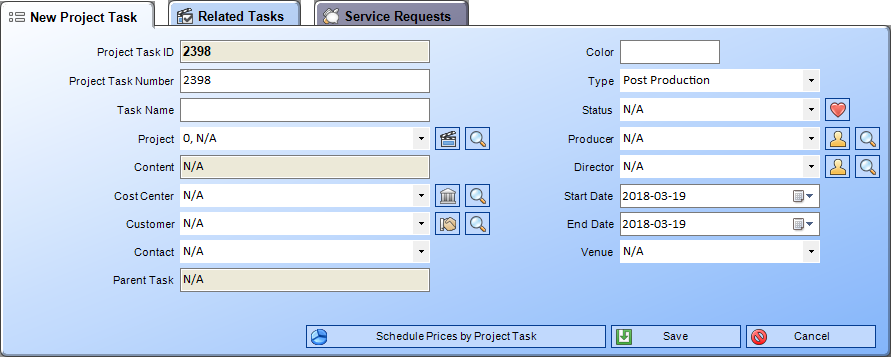
Project Task Details
Project Task ID: The Project Task unique identifier, automatically assigned by VimBiz.
Project Task Number: An internal reference number for the Project Task.
Task Name: Name for the Project Task, as it will appear in the Resource Scheduler.
Color: Events will use this color as their background color in the Resource Scheduler form if the Settings section is set to use Project Tasks for its color scheme.
Type:Project Task Type related to the Project Task.
Status:Scheduling Status of the Project Task. Click the button to view the Status details.
Project: Production Project to which the Project Task is linked. Click the button to view the Production, or to find another project.
Cost Center: Cost Center where Project Task costs will be assigned. Click the button to view the Cost Center's Details, or to find another cost center.
Customer: Customer requesting the Project Task. Click the button to view the Customer's Details, or to find another customer.
Producer: Name of employee fulfilling the Producer role. Click the button to view the Employee's Details, or to find another employee.
Director: Name of employee fulfilling the Director role. Click the button to view the Employee's Details, or to find another employee.
Service Requests
Displays all Service Requests related to the Project Task.
ADD: Click on the  New Service Request button, or by right-click and select New Service Request.
Service Requests are administered in the Service module.
Click the  button to open the Schedule Costs By Project Task report.
Service Requests
Displays all Service Requests related to the Project Task.
ADD: Click on the New Service Request button, or by right-click and select New Service Request.
DELETE: Right-click on an entry and select Delete from the context menu.
Service Requests
Image: Picture or Image of the Asset to be serviced.
SR #: When a Service Request is created in the New Service Request form, VimBiz assigns a number to the new record.
Green numbers flag that the Service Request remains active, Red numbers warn that there are other issues with the selected Asset, and Black numbers indicate that the Service Request has been closed.
Requester: Name of the Employee who has created the Service Request.
Employees are administered in the Manage Employees form.
Room: The Room where the Service Request is to be completed.
Rooms are administered in the Manage Rooms form.
Priority: Priority that has been assigned to the Service Request.
Priorities are administered in the Priority Types form.
Product Type, Model: Type and Model of the Product related to the Asset that is being reported for service.
Products are administered in the Manage Product Catalog form.
Asset Number, Serial Number: Numbers assigned to identify the Asset.
Assets are administered in the Manage Assets form.
Service Request: Name of the Predefined Service Request that has been assigned.
Service Requests are administered in the Predefined Service Requests form.
Request Notes: Notes that were added to the Service Request Details form.
Actions & Solutions: List of actions that were assigned in the Service Request Details form.
Actions are administered in the Manage Predefined Service Actions form.
Assigned To: Name of the Employee to whom the Service Request has been assigned.
Employees are administered in the Manage Employees form.
Status: Status of the Service Request.
Statuses are administered in the Service Request Statuses form.
Date Requested: Date and Time when the Service Request was created in the New Service Request form.
Duration: The Duration of a Service Request is based on the sum of all Action durations, and is displayed in minutes.
Service Requests are administered in the Service module.
Project Task ID
The Project Task unique identifier.
This number is automatically assigned by VimBiz when a Project Task is created.
Project Task Number
Optionally assign a secondary number to the Project Task.
Task Name
Name for the Project Task, as it will appear in the Resource Scheduler.
Project
Number and name of the Production Project to which the Project Task is linked.
Projects are administered in the Manage Production Projects form.
Click the button to view the Project's Details form.
Click the button to find another project.
Content
Project Tasks are linked to Production Projects, and Projects can optionally be linked to Content.
The number and name of the related Content will appear here.
Cost Center
Name of the Cost Center where Project Task costs will be assigned.
Cost Centers are administered in the Cost Centers form.
Click the button to view the Cost Center's Details.
Click on the button to find another cost center.
Customer
Name of the Customer requesting the Project Task.
Customers are administered in the Manage Customers form.
Click the button to view the Customer's Details.
Click on the button to find another customer.
Color
Select a color to represent the Project Task in the Resource Scheduler form.
Events will use this color as their background color if the Settings section is set to use Project Tasks for its color scheme.
IMPORTANT: When the Project Task is created, it will, by default , adopt the color from its related Production Project.
Type
Project Tasks can be grouped by Types, for reporting purposes.
Displays the name of the related Project Task Type.
Status
Scheduling Status of the Project Task.
Statuses are administered in the Scheduling Statuses form.
Click the button to view the Status details.
Producer
Name of employee fulfilling the Producer role.
Employees are administered in the Manage Employees form.
Click the button to view the Employee's Details.
Click the button to find another employee.
Director
Name of employee fulfilling the Director role.
Employees are administered in the Manage Employees form.
Click the button to view the Employee's Details.
Click the button to find another employee.
Start Date
The date on which the Project Task is scheduled to begin.
End Date
The date on which the Project Task is scheduled to be completed.
REPORT: Schedule Costs By Project Task
Click this button to open the Schedule Costs By Project Task report.
ADD: Click on the New Content Genre button, or right-click and select New Content Genre from the context menu.
EDIT: Double-click on a Type to modify its details.
DELETE: Right-click on an entry and select Delete from the context menu.
Name
Name of the Content Genre.
New Content Genre
Click on this button to create a Content Genre record.
Details
Name: Type the name of the type of content.
Select a checkbox to file the Discrepancy under a tab in the Manage Content form.
Program: Check this box to label the Content Genre as a Program.
Promo: Check this box to label the Content Genre as a Promo.
Commercial: Check this box to label the Content Genre as a Commercial.
Employees on Email List
EDIT: Click on the Manage Category Employees button to populate a list of Employees who will receive an e-mail for this type of Content.
Full Name: Name of the Employee
Title Client: The title of the Employee
Employee information is administered in the Employee Details form.
Check one or many boxes to define which Severity levels should prompt an email to each employee.
Severities are set in the Discrepancy Details form.
V. Low: Check this box to send emails for Discrepancies that are set with a Very Low severity.
Low: Check this box to send emails for Discrepancies that are set with a Low severity.
Medium: Check this box to send emails for Discrepancies that are set with a Medium severity.
High: Check this box to send emails for Discrepancies that are set with a High severity.
V. High: Check this box to send emails for Discrepancies that are set with a Very High severity.
All: Check this box to send emails for All Discrepancies, no matter the Severity level.
Severities are administered in the Manage Severities form.
ADD: Click on the New Discrepancy Category button, or right-click and select New Discrepancy Category from the context menu.
EDIT: Double-click on a Category to view its details.
DELETE: Right-click on an entry and select Delete from the context menu.

Discrepancy Category Types
Displays the list of Category Types.
Category Types are administered in the Production form.
Click on a Category Type to filter the list of Discrepancy Categories.
ID
VimBiz automatically assigns an ID Number to each created record.
Name
Name of the Discrepancy Category
Type
Name of the Category Type that is matched with the Category.
Order
The order in which Discrepancies will appear in a list.
On Air Affected
Discrepancies created with a Category where this flag is set will automatically set the On Air Affected flag.
Informational
Discrepancies created with a Category where this flag is set will be flagged as Informational in various reports.
Default
Categories with this box checked are set as the Default Category for the related Category Type.
Selecting the Category Type will automatically set this value in the Category field in the Production form.
Predefined Service Request
Service Requests can be linked to a Discrepancy.
Creating a SR in the Production form will set this Request by default in the New Service Request form.
New Discrepancy Category
Click this button to create a Discrepancy Category
 Discrepancy Category Details
Category Type: Select a Category Type by which the Category will be sorted.
Category Types are administered in the Production form.
IMPORTANT: If a Category Type is selected before clicking the New button, the selected value will be inserted in this field by default.
Order Num: Enter a number to set an order to the list of Categories.
Name: Type a description to define the Category.
On Air Affected: Flags that On Air Broadcast is affected by Discrepancies under this category.
Informational: Flags that Discrepancies under this category are for informational purposes only.
Default: When checked, this Discrepancy Category will be picked by default when the Category Type is selected.
Predefined Service Request: Select a Service Request from the list.
When a Service Request is linked to the Discrepancy, this Request Type will be selected by default.
Predefined SRs are administered in the Predefined Service Requests form.
Employees
EDIT: Click on the Manage Category Employees button to populate a list of Employees who will receive an e-mail for this type of Category
Full Name: Name of the Employee
Title Client: The title of the Employee
Employee information is administered in the Employee Details form.
Make Good: Check this box to send emails for Discrepancies where a Make Good is requested.
This flag is set in the Production form.
Check one or many boxes to define which Severity levels should prompt an email to each employee.
Severities are set in the Production form.
V. Low: Check this box to send emails for Discrepancies that are set with a Very Low severity.
Low: Check this box to send emails for Discrepancies that are set with a Low severity.
Medium: Check this box to send emails for Discrepancies that are set with a Medium severity.
High: Check this box to send emails for Discrepancies that are set with a High severity.
V. High: Check this box to send emails for Discrepancies that are set with a Very High severity.
All: Check this box to send emails for All Discrepancies, no matter the Severity level.
Severities are administered in the Production form.
ADD: Click on the New Discrepancy Category Type button.
EDIT: Double-click on a Category Type, or right-click and select Discrepancy Category Type Details from the context menu.
DELETE: Right-click and select Delete from the context menu.
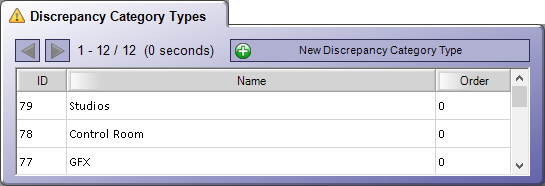
ID
Record ID Number, as assigned by VimBiz.
Name
Assign a name to the Discrepancy Category Type, as it will appear throughout VimBiz.
Order
Set the order in which Category Types will appear in a drop-down list.
New Discrepancy Category Type
Click this button to create a Category Type
Type in a Name and Order Number in the New Discrepancy Category Type form.
ADD: Click on the New Cause button, or right-click and select New Cause from the context menu.
EDIT: Double-click on a Cause to modify its details.
DELETE: Right-click on an entry and select Delete from the context menu.
Order Num
The numbers in this list will define the order that the Causes will appear in a drop-down list.
EDIT: Double-click on a cell and type a number.
Name
The name of the Cause.
New Cause
Click on this button to create a Cause record.
Cause Details
Name: Type the name of the Cause.
ADD: Click on the New Content Source button, or right-click and select New Content Source from the context menu.
EDIT: Double-click on a Source to modify its details.
DELETE: Right-click on an entry and select Delete from the context menu.
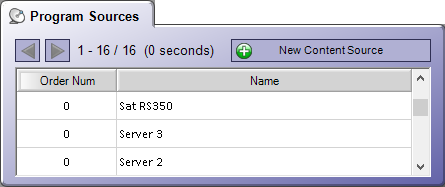
Order Num
The numbers in this list will define the order that the Causes will appear in a drop-down list.
EDIT: Double-click on a cell and type a number.
Name
The name of the Content Source.
New Content Source
Click on this button to create a Content Source record
Details
Name: Type the name of the Content Source.
ADD: Click on the New Network Feed button, or right-click and select New Network Feed from the context menu.
EDIT: Double-click on a Feed to view its details.
DELETE: Right-click on an entry and select Delete from the context menu.
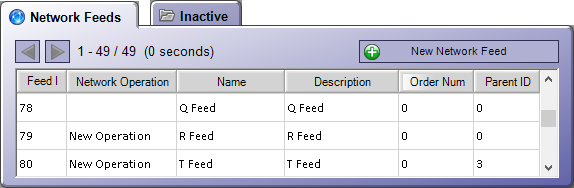
ID
VimBiz automatically assigns an ID Number to each created record.
Name
Name of the Network Feed
Description
Details on the Network Feed
Parent ID
If the Network Feed has been linked to another Network, the ID of the Parent will appear in this cell.
Active
When the box is checked, this indicates that the Network Feed is Active.
An unchecked box flags an Inactive Network Feed.
New Network Feed
Click on this button to create a Network Feed record.
 Network Feed Details
Name: Type the Name of the Network Feed.
Description: Enter a description that defines the Network Feed.
Active: Check this box to indicate that the Network is Active, or leave the box unchecked to flag an Inactive Feed.
Employees on Email List
Create a list of employees who will receive emails when a Discrepancy with this Network Feed is created.
Full Name: Name of the Employee
Title Client: Title of the Employee
Business Phone: Telephone number where the Employee can be reached
Cellular Phone: Cellular telephone number for the Employee.
Employee information is administered in the Employee Details form.
Mgmt: Check this box to indicate that the Employee is a member of the Management team.
Child Network Feed
To make the Network Feed the Parent of another, list the Child Network in this tab.
EDIT: Click on the Manage Child Network Feeds button and select a Network Feed from the list.
ADD: Click on the New Severity button, or right-click and select New Severity from the context menu.
EDIT: Double-click on a Severity to modify its details.
DELETE: Right-click on an entry and select Delete from the context menu.
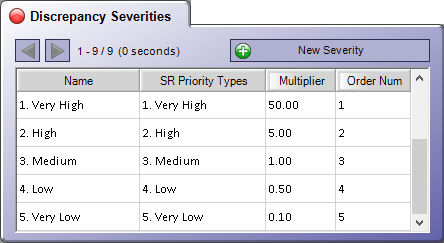
Name
Name of the Severity, that describes the level of urgency of the Discrepancy.
New Severity
Click this button to create a Severity record.
Severity Details
Name: Type the name of the Severity.
Employees
EDIT: Click on the Manage Severity Employees button to populate a list of Employees who will receive an e-mail for this type of Severity.
ADD: Click on the New Discrepancy Action button, or right-click and select New Discrepancy Action from the context menu.
EDIT: Double-click on an Action to modify its details.
DELETE: Right-click on an entry and select Delete from the context menu.
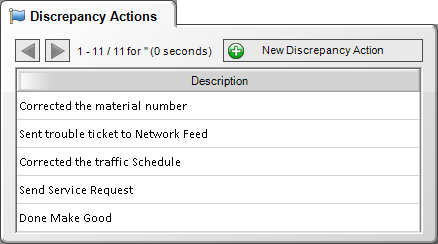
Description
Details on the Discrepancy Action.
New Discrepancy Action
Click this button to create a Discrepancy Action
A new line will appear in the grid.
Type a Description of the new Action.
ADD: Click on the New Discrepancy Observation button, or right-click and select New Discrepancy Observation from the context menu.
EDIT: Double-click on an Observation to modify its details.
DELETE: Right-click on an entry and select Delete from the context menu.
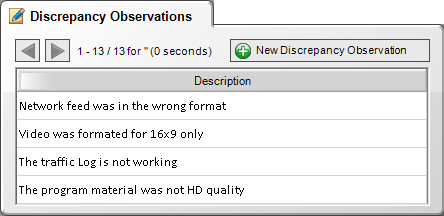
Description
Details on the Discrepancy Observation.
New Discrepancy Observation
Click on this button to create a Discrepancy Observation.
A new line will appear in the grid.
Type a Description of the new Observation.
ADD: Click on the Add Employee button, or right-click and select New Employee from the context menu.
EDIT: Double-click on an Employee to view their details.
DELETE: Right-click on an entry and select Delete from the context menu.

Location Tree
The location tree is subdivided by Region, Building, Area, Room, Rack and Shelf
Locations are administered in the Manage Rooms form.
Employee E-Mail Setting Filters
Employees Receiving All Disc. E-Mails: List of Employees who are flagged to receive ALL Discrepancy Emails and/or Make Good Emails in this form.
Employees Receiving Filtered Disc. E-Mails: Employees can be set to receive e-mails based on Production, Production, Production, or Content Types.
Any employee who is set to receive one or many of these e-mails will appear under this tab.
EDIT: Double-click on an Employee to review a list of their email assignments.
All Active Employees: List of all Employees that have been assigned an Active status in their Employee Details form.
Employees are administered in the Manage Employees form.
Discrepancy E-Mail
Check this box to send an e-mail to the Employee when any Discrepancy is created.
IMPORTANT: This attribute will override any Email Settings from the Production, Production, Production, or Content Types forms.
Make Good E-Mail
Check this box to send an e-mail to the Employee when any Make Good is requested.
IMPORTANT: This attribute will override any Email Settings from the Production, Production, Production, or Content Types forms.
Add Employee
Click on this button to create a new Employee Record in the Employee Details form.
Employees are administered in the Manage Employees form.
ADD: Click on the New Project Task Type button
EDIT: Double-click on a Type to open the Project Task Type Details form
DELETE: Right-click on a record and select Delete from the context menu
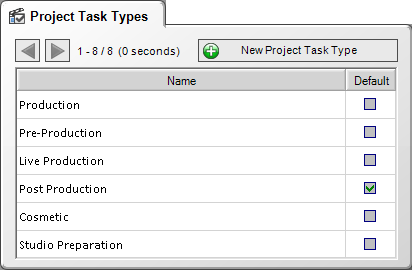
Name
Name of the Project Task Type, as it will appear throughout VimBiz.
Default
Check this box to select the Project Task Type that will be linked to New Project Tasks.