Multi-User and Network Installation
OVERVIEW: This is a guide to installing and configuring VimBiz in a production environment.
SQL Server Installation Procedure
NOTE: Before installing VimBiz on an SQL server, be sure all System Requirements have been met.
- Copy the VimBiz setup file to the system where VimBiz is to be installed or ensure network access to the file.
- Open VimBizSetup****.msi.
IMPORTANT: It is recommended to run the file with administrative rights.
- Select the default folder for installation.
With administrative rights to the machine, the .msi setup will allow the installation of VimBiz for anyone using the system. By selecting the Everyone option, all users logging in to the system will have a VimBiz shortcut installed on their desktop. - Follow the rest of the VimBiz on-screen installation instructions.
- Click the Close button after installation has completed.
- Launch VimBiz and select one of the following options:
- Install VimBiz Database on this computer (Recommended): Select this option to host the VimBiz database locally on the server. The setup will install a new instance of MS-SQL Express 2008 R2 server and the required VimBiz databases. An administrator account is required. Fill in the form appropriately to complete the setup.
- Install VimBiz Database on an existing MS-SQL server (Advanced): Select this option to create the required VimBiz databases on an existing MS-SQL installation. The SQL server location and credentials will need to be entered before the setup can complete the VimBiz database creation. To complete the setup, fill in the Administrator's First and Last Name and Company Name.
- Workstation Connectivity: See Workstation Connectivity to Server.
Users and Permissions
To use the current Active Directory users and groups in VimBiz and set permissions:
- Pre-SQL Configuration
- Set up the appropriate User Group and affected Active Directory permissions.
- Add all required Active Directory Users to the User Group.
- SQL Configuration
- Create an SQL Server-level Login for the AD User Group
- From the Security > Logins folder, right click and select New Login

- From the New Login screen, select Windows Authentication.
- Click Search to find the User Group to be added.
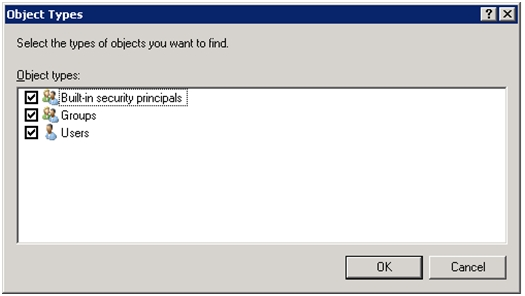
- If "Group" is not listed in the Object Types box, click the Object Types button to bring up a selection dialog.
- Type the name of the User Group or click Advanced for additional search options. When the group is found, click OK.
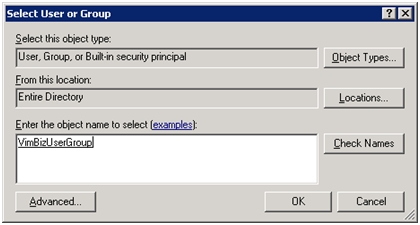
In this example, the group is named " VimBizUserGroup"
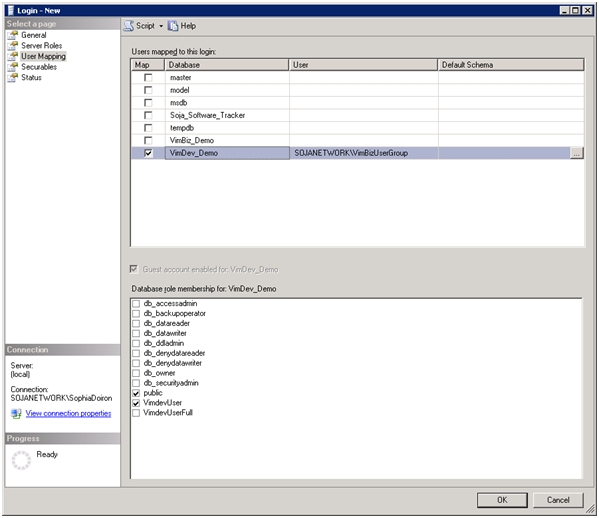
- Select the User Mapping page to map login to the appropriate roles.
- Map to VimDev.
- Locate the "VimDev_XXXX" database that is paired to "VimBiz_XXXX".
- Check the "Map" checkbox.
The User column should now have the name of the User Group login and the roles for the database should appear in the box below. - Check the "VimDevUser" role.
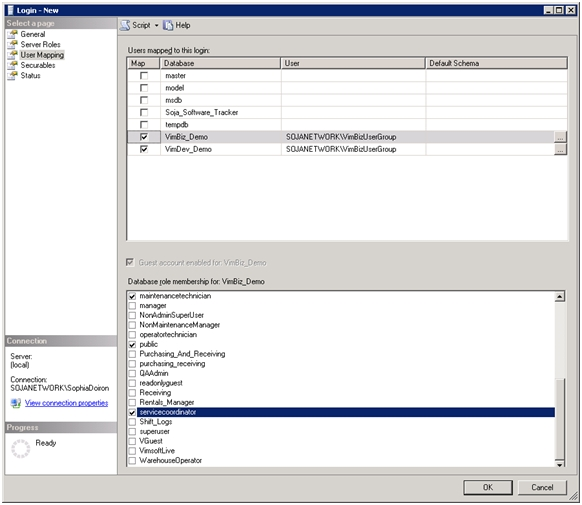
- Mapping to VimBiz
- Locate the "VimBiz_XXXX" database.
- Check the "Map" checkbox.
The roles for the database should appear in the box below. - VimBiz has many predefined roles, ranging from Maintenance Technician to Super User. Select the appropriate roles for the User Group. In this example, Maintenance Technician and Service Coordinator are chosen.
- Click OK to complete the setup.
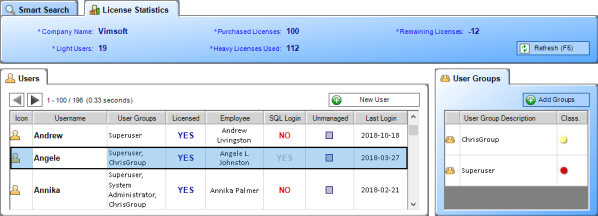
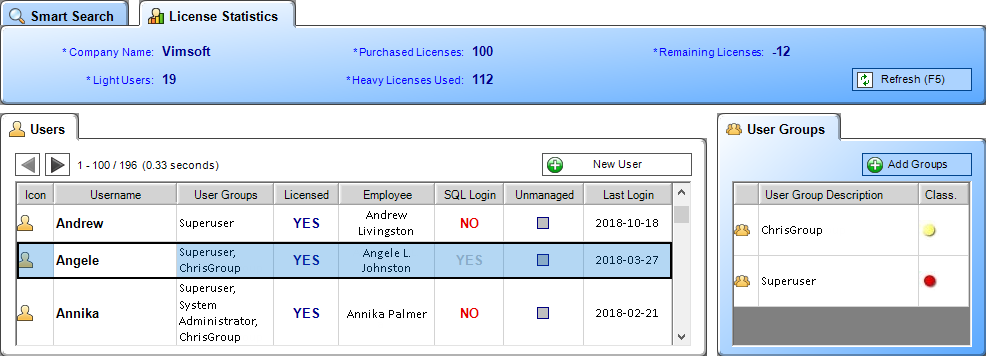
When new group users log into VimBiz, a User profile and Employee are inserted into the VimDev system with the roles that were assigned to the group. - To view VimBiz users and their respective groups, go to Start > Administer > Permissions & Usage > Users & Groups > Users.
Workstation Connectivity to Server
Once the VimBiz server has been configured and clients can connect to it, there are two workstation possibilities:
- VimBiz installed locally:
- Launch VimBiz
- At the Login screen, click the Settings button.
At least two Database entries are listed, VimDev_Production and VimDev_Demo. - To create a new connection Right click in the list, and select New
A new line will be added to the grid. - Enter a name for the VimBiz Server under the Name column
- Enter a connection string to Database under the Server column
Examples of connection strings are:- Data Source= Server_Name/SQL_Instance;Database=DB_Name
- Data Source= Server_Name,Port#;Database=DB_Name
- Data Source= Server_IP,Port#;Database=DB_Name
- VimBiz installed for first time: Prior to VimBiz launching for the first time, three options will appear on the screen:
- Select option three (3); Connect to an existing VimBiz Database. (Adding Clients).
- Enter the VimBiz server information by search or manually type in the information.
The server can be accessed different ways, here are a few examples:- “Server_Name/SQL_Instance”
- “Server_Name,Port#”
- “Server_IP,Port#”
All VimBiz installations have two databases: VimBiz_Vimsoft and VimDev_Vimsoft. To make sure a new database connection string is pointing to the right Database Names:
- Open the VimBiz application
- At the Login form, click on the Setting button
- Enter your User Name and Password
- Right click on a selected Application Databases in the grid and select "Connect"
- Ensure the right Database Names are listed under the Database Settings section