Products
Forms

Product
Enter key details on the product in this section.
 Product
Picture: Displays an Image of the Product.
EDIT: Drag an Image File into this box, or copy an image and select Paste from the context menu.
Product: Displays a read-only description of the Product.
This description is an amalgamation of the Manufacturer, Model, Type, and Description of the Product.
These details are all entered in this tab of the Product Details form (see below).
Manufacturer: Displays the Manufacturer of the Product.
Type the Manufacturer's name in the box, or click on the arrow to select an entry from the drop down list.
Manufacturers are managed in the Manufacturers form.
Click on the  button to view the Manufacturer's Details ,or click the
  button to find another Manufacturer.
Model: The Model name or number for the Product.
Type: The Type or the category of Product that is being entered.
Type the Product Type in the box, or click on the arrow to select an entry from the drop down list.
Product Types are managed in the Manage Product Types form.
Click on the  button to view the Product Type Details, or click the button to find another Product Type.
Description: Additional key details on the Product, that will be part of the Product Name.
Notes: Additional notes or comments on the Product.
Parameters
A Product can have one or many parameters.
Parameters are administered in the Manage Parameters form.
ADD: Click on the Add Parameter button or right click in the list and select the Add Parameter option.
DELETE: Right-click the Parameter to be deleted and select Delete.
Various settings for these parameters are defined under the Settings tab of this Product Details form..
Related Products
Create a list of products that are related to this product.
For example, various camera peripherals could be related to a camera.
ADD: Right-click in the related products list and select the Manage Related Products option to add products that are related to the opened product.
 Related Products
Image: An image of the Product
Manufacturer: The name of the company that manufactured the Product.
Model: The Model Name or Number of the Product.
Type: The type of category of the Product.
Description: Additional information on the Product.
All these details are entered in the Product Details form, under the Product tab.
Relation Type: Select a term that defines the link between the master product and the added product.
EDIT: Double-click on the cell and select an entry from the drop-down list.
Relation Types are administered in the Manage Relation Types form.
Versions
Keep track of all the versions a particular product has gone through over the years under this tab.
ADD: Click on the New Product Version button, or right-click and select New Product Version from the context menu.
 Product Version Details
Product Version: Enter the name or number of the version.
Description: Enter additional information on the new version.
Other
Additional product-related details.
Record History: this section provides up to date information on the product's history
Product ID: This number is automatically assigned by VimBiz when the Product is created in the New Product form.
Created by and Date: When the product was created in the New Product form, the name of the user and the date of the work will be stamped here.
Updated by and Date: Each time a change is made in the Product Details form, the name of the user and the date of the work will be stamped here.
General Statistics: this section lists information related to Assets, Stock and Service Requests
Number of Assets: The total number of Assets that appear under the Assets tab.
Click on the Asset Locations button to view a breakdown of where each Asset is stored.
Asset Locations are defined in the Asset Details form.
Number of items in Stock: The total number of Products that are available in a Stockroom.
Click the Stock Availability button to view a breakdown of where each Product is stocked.
Stock is administered in the Manage Stockrooms form.
Number of SR: The number of Service Requests that have been submitted for the Product and its related Assets.
A list of these SRs is found under the Service tab of this Product Details form.
Product Activities: Click on the button to view the Product Activities report.
Details
Enter key financial, dimensional and technical information for the Product.
Financial Information
MSRP: The Manufacturer's Suggested Retail Price for the Product at the time when the Product was purchased.
Sale: The price at which the Product was actually purchased.
When a Product is purchased at a different price than entered here, this price will be changed to the amount set in the Purchase Order.
Resale Price: The price that the company will charge when reselling the Product.
Resale List: Links the Resale rate to an entry in the Rates form.
This is the default value used for Purchasable Product Rentals; if this entry is N/A, the Rental Rate will instead be used.
Click on the button to view the details of the selected Rate, or click the button to find another Rate.
Sold By Weight: Check this box to indicate that the Sale Price will be based on the weight of the Product.
Leave the box unchecked to indicate that the Sale Price does not account for the Product's weight.
Depr. Rate (%): This field is used to enter the annual depreciation rate of the Product.
Inherit Prod. Class Schedule: Check this box to make the Product inherit the schedule of its Product Type Class.
Product Type Classes are administered in the Product Type Classes form.
Leave the box unchecked to assign an independent schedule to the product (see next field).
Schedule: A product schedule determines its appreciation or depreciation in value over time, and can be inherited from the Product Type's Class.
Schedules are administered in the Product Value Schedules form.
Click the button to view details on the selected schedule, or click the button to find another Schedule.
Useful Life: Enter the estimated / evaluated number of years during which the product should be functional.
Dimensions and Weight
Dimensions: Displays the dimensions of the Product (Length x Width x Height)
Net Weight: Displays the net weight of the Product.
Gross Weight: Displays the gross weight of the Product.
Unit Type: The User must select the basic quantity by which this Product is priced and purchased.
Examples of unit type: "Foot", "Each", "Kg".
Unit Types are administered in the Product Unit Types form.
General Information
UPC: Displays the UPC of the Product.
Part Number: Displays the specific part number of the Product.
Manuf. Year: Displays the year when the Product was manufactured.
Barcode Prefix: If the company works with a barcode system, displays the first characters (letters and/or numbers) that are used on the barcodes.
Discontinued: Check this box to indicate that the Product has been discontinued, or leave the box unchecked to flag that the Product remains active.
Discontinued Products are listed under the Discontinued Products tab of the Manage Product Catalog form.
Part: Check this box to indicate that the Product is a Part.
Parts are listed under the Parts tab of the Manage Product Catalog form.
Tangible: Check this box to indicate that the Product is tangible.
Create PO: Check this box to automatically create a Purchase Order when the Product is invoiced, even if the product is not tangible.
Hazardous: Check this box to indicate that the Product is Hazardous.
Hazardous Products are listed under the Hazardous Products tab of the Manage Product Catalog form.
Tax Exempt: Check this box to indicate that the Product is exempt from taxes.
This filter will be applied when processing Purchase Orders.
Status: Select a Product Status from the drop down list.
Product Statuses are administered in the Manage Product Statuses form.
Suppliers
List of all the Suppliers who can sell the Product.
Suppliers are managed in the Suppliers form.
ADD: Right-click and select Manage Suppliers from the context menu.
DELETE: Right-click on an entry and select Delete from the context menu.
Suppliers
Image: A logo or image that represent the Supplier.
Name: The name of the Supplier.
Website: The Supplier's website address
This information is administered in the Supplier Details form.
Product Link: Insert a link to the Product on the Supplier's website as a reference on the current sale price.
Part #: Enter the part number that is used to refer to the Product with that Supplier.
Sale Price: Enter the price that the supplier charges for the Product.
The lowest sale price will appear in a blue font.
The median sale price(s) will appear in a black font.
The highest sale price will appear in a red font.
IMPORTANT: When a Product is purchased at a different price than entered here, this price will be changed to the amount set in the Purchase Order.
Pref. Supplier: When more than one supplier is listed, check this box for the Supplier from whom products should preferably be ordered.
If no Supplier is set as the Preferred Supplier, the Supplier with the lowest sale price will be selected during a Purchase Order.
URLs
List of URLs pertinent to the product, for instance, the manufacturer's website.
 URLs
URLs
Title: Type a title for the URL.
URL: Enter the internet address.
E-Documents
The user can link any file document or any other type of file to the Product.
ADD FROM COMPUTER: Click on the  Insert New File button, or right-click and select Insert New File from the context menu.
User's can also drag any File from their desktops and drop it on the E-Document panel .
ADD FROM E-TREE: The  Add Existing File button is to add an e-document that is already in VimBiz' E-Tree.
EDIT: Double Click on the file in the grid to open the file.
DELETE: Right-click on an entry and select Delete from the context menu.
Service
Any active Service Requests on an Asset-type Product will appear under this tab.
Service Requests are administered in the Manage Service Requests form.
All details listed under this tab are entered in the New Service Request or Service Request Details form.
 Service
Image: The photograph or image of the Asset.
ID: Unique number assigned to the Service Request .
Requester: The name of the employee who requested the service request on the product.
Area, Room: The area and room where the product is currently located.
Priority: The level of urgency of the service request.
Product Type: The type or category that the product belongs to.
Model: The specific model number of the product.
Service Request: A brief description about the service request problem that has been associated to the product.
Request Notes: Any additional details that were noted for the service request of the product.
Actions & Solution: Any actions or solutions that were noted for the service request of the product.
Assigned To: The name of the engineer that was assigned to the service request of the product.
Status: The current status of the service request.
Date Requested: The date and time that the service request was requested.
Assets
Assets are Products that exist in the company's inventory.
Assets are administered in the Manage Assets form.
ADD: Click on the New Asset button, or right-click and select New Asset from the context menu.
EDIT: Double-click on an Asset to open the Asset Details form.
DELETE: Right-click on an entry and select Delete from the context menu.
 Assets
Image: Displays an Image of the Product.
Manufacturer, Model, Type: Provides a real-time description as will be shown in VimBiz for this Product.
Description: Additional information on the Product
Region, Building, Area and Room: Records the physical location where this product is stored or can be found.
Nickname: Displays the name or term commonly used to refer to this product.
Asset Number: Displays the unique number assigned to the product by the company.
Serial Number: Displays the unique number assigned to the product by the manufacturer.
Service Requests (SR): Displays the number of service requests associated to this product.
Rentable: A checkmark in this box indicates the Asset is made available for Rental.
This detail is specified in the Asset Details form, under the Operation tab.
Specifications
This list displays all the Product Type Specifications entered in the Product Type Details form, along with the specification's value.
EDIT: Right-click and select Manage Product Type Specifications from the context menu.
Images
Add any Images that are pertinent to the product.
ADD FROM COMPUTER: Click on the  Insert Images button.
User's can also drag any images from their desktops and drop it on the E-Document panel .
ADD FROM E-TREE: The Insert Existing File button is to add an e-document that is already in VimBiz' E-Tree.
EDIT: Double Click on the file in the grid to open the file.
DELETE: Right-click on an entry and select Delete from the context menu.
Rentals
When Products and their related Assets are rented, a cost is charged based on the settings under this tab.
Rental Rate: Displays the Daily Rental Rate of the Product. that is not configured with a List Rate (see below).
List Rate: Displays the Daily Rental Rate that is linked to an entry in the Rates form.
This is the default value used for Product Rentals; if this entry is N/A, the Rental Rate will instead be used (see above).
Rates are administered in the Rates form.
Click on the ![]() button to view the details of the selected rate, or click on the button to find another rate.
button to view the details of the selected rate, or click on the button to find another rate.
IMPORTANT: The Asset must have an active Rentable attribute to enable this functionality
Rental Policy: Displays a list of Rental Policies.
Policies are administered in the Rental Policies form.
Click on the  button to open the Rental Details Policy form.
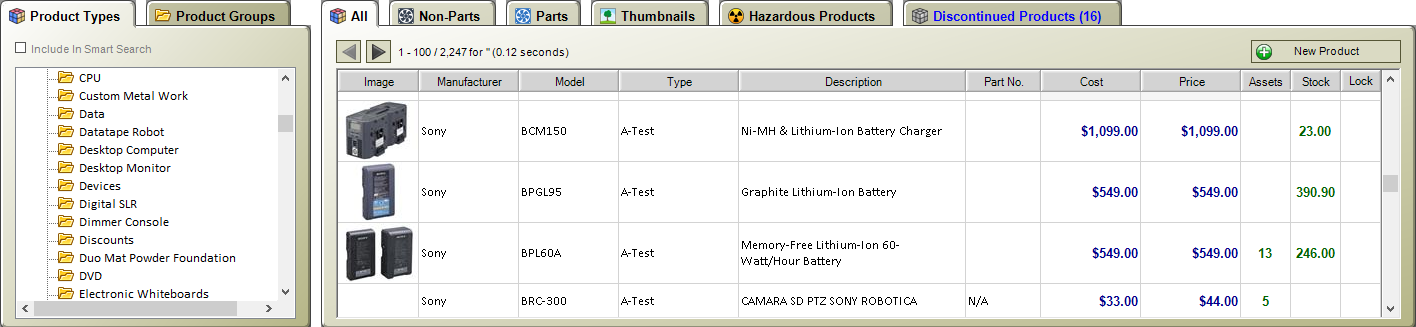
OVERVIEW: The Manage Product Catalog form is the main access to manage Products. This structure simplifies the management of Product Information and enforces the integrity of the referential structured data. Products can be assigned as an equipment Asset in the Manage Assets module, or as Parts in the Stockrooms module.
ADD: Click the New Product button, or right-click and select New Product in the context menu.
EDIT: Double-click on an entry to open the Product Details form.
DELETE: Right-click on a Product and select Delete.
Product Types
In the Manage Product Catalog form, products are categorized by types.
The Product Types field, found at the Product Details level, is used to structure the Products by their functionalities.
VimBiz then builds a hierarchy of categories which is represented in this panel. The User can navigate to a specific Product Type and view all Products of that Product Type.
Product Types are administered in the Manage Product Types form.
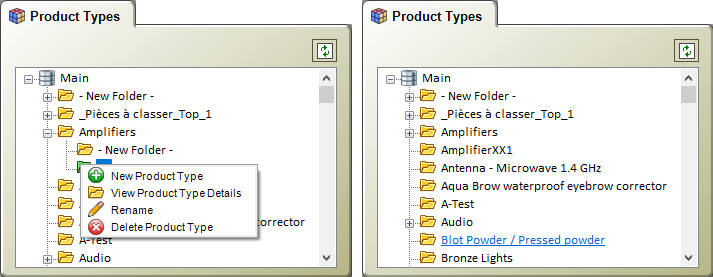
ADD: Right-click on the Main Node or on a Product Type Folder and select New Product Type from the context menu.
A new folder will appear, and can be renamed.
EDIT: Right-click on the folder and select Product Type Details in the context menu.
DELETE: Right-click on an entry and select Delete Product Type from the menu.
Right-click on a Product Type to open the Product Type Details form.
 Product Type Details
Name: Name of the Product Type which best describes its purpose
Class: Assign the Product Type to a specific Class.
Classes are administered in the Product Type Classes form.
Click on the  button to open the details form.
Useful Life: Number of years during which the product is estimated to remain useful
Product Type Specifications
ADD: Right-click in the panel and select Add New Specification from the context menu.
Name: Name of Product Type Specification.
Specification Type: Double-click on the cell to designate either an Asset or a Product Specification.
Product Groups
Much like the Product Types panel, products are assembled in Product Groups often used for specific Event Types
Product Filters
Products are filtered in one or many of the following tabs:
All: a non-filtered list of products will appear under this tab, respecting the search performed in the Search Panel or the type selected in the Product Types panel.
 Non-Parts: only the products that are not flagged as a Part in the Product Details will appear under this tab, respecting the search performed in the Search Panel or the type selected in the Product Types panel.
 Parts: only the products that are flagged as a Part in the Product Details will appear under this tab, respecting the search performed in the Search Panel or the type selected in the Product Types panel.
Thumbnails: thumbnail images of non-filtered products will appear under this tab, respecting the search performed in the Search Panel or the type selected in the Product Types panel.
 Hazardous Products: only the products that are flagged as Hazardous in the Product Details will appear under this tab, respecting the search performed in the Search Panel or the type selected in the Product Types panel.
 Discontinued Products: only the products that are flagged as Discontinued in the Product Details will appear under this tab, respecting the search performed in the Search Panel or the type selected in the Product Types panel.
Context Menu
New Product: Opens a form for the User to enter a new Product.
Product Details: View the details of the selected Product.
Bulk Change Products: Select multiple products and select this option to see a list of properties that can be modified for all the selected products.
Manage Assets by Product: Opens a form that displays all of the assets that are linked to a selected Product
 Product Links: Opens a quick snapshot giving details on the Product and where in VimBiz the Product is referred to.
 View Product Spec. Report: Opens a form which contains a Report on the Specifications of the Product.
 Rental Usage by Product And Service Center: Opens a form which contains a Report on the Rental Usage by Product and Service Center.
View Product Activities Report: Opens a form which contains a Report on Product Activities.
 Clone Product: Clones the selected Product. All details of a Cloned Product will be identical except the Model which will have 'Cloned' appended to it.
 Refresh: Refreshes the records in the grid.
 Export: Exports the grid contents to an XML, Excel, HTML or CSV file format.
Export Product Details: Exports one or many selected products to an XML file.
 Product Service Experts:
 Delete: Deletes the selected Products.
New Product
Click this button to create a Product.
Consult the Product Details section for instructions on how to populate to the Product Catalog and insert key information on new products
Image
A photograph or image of the Product.
This same image will be used to represent the Product under the Thumbnails tab.
This detail is entered in the Product Details form.
Manufacturer
The name of the company that manufacturers the product.
Manufacturers are administered in the Manufacturers form.
This detail is entered in the Product Details form.
IMPORTANT: If the Manufacturer name appears in a red font, this is to flag that the Product is marked as Hazardous. This detail is entered in the Product Details form.
Model
Displays the Product's Model Name.
This detail is entered in the Product Details form.
IMPORTANT: If the Manufacturer name appears in a red font, this is to flag that the Product is marked as Hazardous.
This detail is entered in the Product Details form.
Type
The name of the type of the product.
Product Types are managed in the Manage Product Type form.
This detail is entered in the Product Details form.
IMPORTANT: If the Manufacturer name appears in a red font, this is to flag that the Product is marked as Hazardous.
This detail is entered in the Product Details form.
Description
Displays a description that is specific to the Product.
This detail is entered in the Product Details form.
Part No.
Displays a part number that is specific to the Product.
This detail is entered in the Product Details form.
Sale Price
Displays the Price at which the Product is sold.
This detail is entered in the Product Details form.
Resale Price
Displays the Price at which the Product is resold.
This detail is entered in the Product Details form.
Assets
Displays the number of Products that have been defined as Assets.
This detail is entered in the Product Details form.
Assets are administered in the Manage Assets form.
Stock
Displays the total number of products in stock in various stockrooms.
Stock is administered in the Manage Stockrooms form.
OVERVIEW: This form is identical in layout to the Manage Product Catalog form, but in a read-only version.
This section contains the same information as the Manage Product Catalog form, with identical functionalities. Likewise, any Product Detail is viewed by double-clicking on it, and further details can be revealed, but cannot be altered.
OVERVIEW: Though the layout is reminiscent of the Manage Product Catalog form and most of its functionalities are identical, users will appreciate viewing Product Statistics in this form

SR / Avg Statistics
Various statistics on the Products' Service Requests are found here.
The number of Service Requests will appear in a red font.
The number of days between Service Requests will appear in a blue font.
SR (Total): Total number of Service Requests submitted for the Product and its related Assets.
Avg. (Total): Average number of days between Service Requests for the total period.
SR (12 Months): Number of Service Requests submitted during the past 12 months for the Product and its related Assets.
Avg. (12 Months): Average number of days between Service Requests for the past 12 months.
SR (6 Months): Number of Service Requests submitted during the past 6 months for the Product and its related Assets.
Avg. (6 Months): Average number of days between Service Requests for the past 6 months.
Days Since
Displays the number of days since the Product has last been used.
Assets
Number of Assets that have been created for the Product
Assets are administered in the Manage Assets form.
OVERVIEW: The User can create unique Specification fields for each Product Type. Specifications can also be created to track at the Asset (each unit) level and the Product (each model) level.

Product Type Specification
Name of the Product Type Specification.
Spec Value
Value assigned to the Product Type Specification.
Product
Double-clicking on a row will open the Product Details form
The number displayed in this column is the Model Number.
OVERVIEW: A Product Type is linked to a Product via the Product Details form. Product Types are used to structure Products by their functionalities in many forms such as in the Manage Product Catalog.
ADD: Right-click in either Product Types list shown in the form and select New Product Type. The new Product Type will be inserted below the level that was selected when the right-click was performed. Meaning, if the user right-clicks on "Main", the new Product Type will appear directly under that point; if the user right-clicks on an existing Product Type, a sub-folder is created. The form is arranged to facilitate the drag and drop of a Product Type into another one, creating parent-children relationships.
EDIT: Right-click on a folder and select View Product Type Details
DELETE: Right-click the Product Type to be deleted and select Delete.
Product Types - From
Product Types - To
View Product Type Details
Right-click on a folder and select this option to view the details.
Product Type Details
Name: The English name of the Product Type.
Class: The Class the product is part of.
Classes are administered in the Product Type Classes form.
Click on the button to view the details of the selected Class.
Useful Life: Useful life of the product type class.
This value will be populated by what's at the Class level, or can be overwritten.
Product Type Specifications
ADD: Right-click and select Add New Specification from the context menu.
This will insert a blank entry in the grid. Double-click in a field to enter Specification information.
An unlimited amount of specifications can be added in this list.
DELETE: Right-click on an entry and select Delete from the context menu.
Name: Type a description of the Specification
Specification Type: Select whether this Specification is to be at the Product or Asset level.
ADD: Click on the New Product Unit Type button or right-click in the list and select the New Product Unit Type option.
EDIT: Double-click on the selected Product Unit Type.
DELETE: Select the entry to be deleted and click on the Delete button.
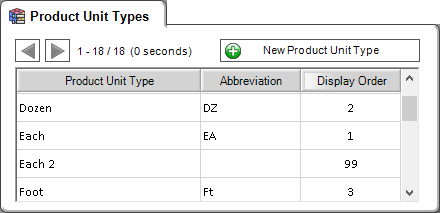
Product Unit Type
The Name of the Product Unit Type, as it is packaged or sold.
Abbreviation
An appropriate abbreviation for the Product Type Name.
Display Order
The order (starting at 1) in which Product Types will be displayed in drop-down lists.
New Product Unit Type
Click this button to create a Product Unit Type.
Product Unit Type Details
Product Unit Type: Enter a name for the new Unit Type.
Abbreviation: Create an abbreviated name for the Product Unit Type.
OVERVIEW: Product Value Schedules determine how a product will appreciate or depreciate in value over time.
ADD: Click on the New Product Value Schedule button or right-click in the list and select the New Product Value Schedule option.
EDIT: Double-click on the selected Product Value Schedule.
DELETE: Select the entry to be deleted and click on the Delete button.
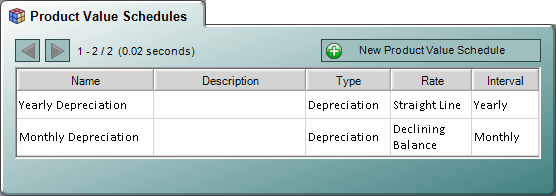
Name
The name of the Product Value Schedule.
Description
The description of the Product Value Schedule.
Type
The Product Value Schedule is either for a product appreciation or depreciation.
Rate
The Rate is either a Declining Balance or Straight Line.
Interval
The Interval is either Yearly or Monthly.
New Product Value Schedule
Click this button to create a Product Value Schedule.
Details
Name: Enter a name for the new Schedule.
Type: Select whether the Schedule is for appreciation or depreciation.
Rate: Select whether the Rate is a Declining Balance or a Straight Line.
Interval: Select whether the Interval is Yearly or Monthly.
Description: Add details on the Value Schedule.
 Schedule
Interval: Insert a value for the set interval (yearly or monthly).
Rate: Define at what rate the Products will appreciate or depreciate.
This number will represent a percentage.
Products
A list of products that have been assigned the Value Schedule.
This assignment is done in the Product Details form.
OVERVIEW: Product Type Classes are to determine the depreciation schedule of a product along with its useful life. Attributes are used to classify Product Types in the Manage Assets form, and control which version of the Asset Details subform is opened.
ADD: Click on the New Product Type Class button or right-click in the list and select the New Product Type Class option.
EDIT: Double-click on the selected Product Type Class to view its details.
DELETE: Right-click on an entry and select Delete from the context menu.

Name
The name of the Product Type Class.
Depreciation Schedule
The Schedule that determines how the product will appreciate or depreciate in value over time.
Schedules are managed in the Product Value Schedules form.
Useful Life
Useful life, in years, of the product type class.
Hardware
Check this box to indicate that the Product Type Class is comprised of Hardware-type Products.
Software
Check this box to indicate that the Product Type Class is comprised of Software-type Products.
Medium
Check this box to indicate that the Product Type Class is comprised of Media-type, or Medium, Products.
New Product Type Class
Click on this button to create a Product Type Class
Details
Name: Enter a name for the new Product Type Class
Schedule: Select a Schedule for how the product will appreciate or depreciate in value over time.
Click on the button to view the Schedule Details.
Useful Life: Type the number of years during which the product type will be useful.
ADD: Click on the New Product Status button, or right-click and select New Product Status from the context menu.
EDIT: Double-click on the entry to view its details
DELETE: Right-click on a Status and select Delete from the context menu